Controls denoted by green labels may or may not be visible depending on your options settings for recurring invoices.
Recurring Invoice Record ID
Code
A unique code for the recurring invoice. In the adjacent field, enter a description of the recurring invoice.
Customer
The customer to charge for the recurring invoice. The customer selected determines the invoice defaults including salesperson, customer location, payment terms, customer tax category, and GL accounts. If you change the customer on the recurring invoice, the default information is reset to the defaults for the new customer—even though you may have overridden them for the original customer.
Press F3 to look up the value.
If a value is already selected, you can press F4 to open the record in its native editor.
Calendar
The GL calendar to use to determine the frequency of invoice creation. For instance, to create an invoice once a month, select a monthly calendar. Unless you mark the Allow Duplicates checkbox, ActivityHD does not create duplicate invoices for the same period of the calendar.
Press F3 to look up the value.
If a value is already selected, you can press F4 to open the record in its native editor.
Begin Date
The earliest date that the recurring invoice can be processed. Leave this field blank if you do not want to restrict how early the recurring invoice can be processed.
End Date
The latest date that the recurring invoice can be processed. Leave this field blank if you want to allow the recurring invoice to be processed indefinitely.
Post Day
The day of the accounting period to use as the invoice posting date. Enter zero if you want the invoice date to be the actual date that the recurring invoice is processed. Enter a number that exceeds the last day of the period if you want the invoice date to be the period end date.
Example
If you are using a monthly calendar to process recurring invoices once a month and you want the invoice date on each invoice produced to be the 10th of the month, enter "10".
The invoice scheme on the invoice type assigned to the recurring invoice determines how the invoice number is generated. The invoice number can be created by the Process AR Recurring Invoices wizard, during the invoice merge, or it can be entered manually. If you enter a manual invoice number, the invoice number is the same for every invoice generated from the recurring invoice. This accommodates circumstances when an invoice number has already been assigned and unique invoice numbers should not be generated at processing time. If you need to enter a manual invoice number for the recurring invoice, enter it in this field.
Note
The Invoice # field cannot be changed if the invoice scheme does not allow override.
Amount
The invoice amount. ActivityHD maintains this field; it cannot be modified. The invoice amount includes the total of all detail lines and sales tax. This field is automatically updated as detail lines are added and as other changes are made to the recurring invoice.
Balance
The invoice amount minus the amount of initial payment(s). ActivityHD maintains this field; it cannot be modified.
Recurring tab
Invoice (Classification)
The section title indicates in parentheses the classification (charge, credit, or finance charge) of the recurring invoice. The classification comes from the invoice type assigned to the recurring invoice.
Type
The invoice type for the invoice.
The invoice type provides the following functions:
- Categorizes invoices for reporting.
- Classifies invoices as a charge or credit.
- Controls whether to require a zero balance entry.
- Controls whether the invoice can be posted to AP to generate a customer payment.
- Determine which fields are evaluated to determine duplicate invoice conditions.
- Controls the determination of debit or credit on GL postings.
- Provides the default GL batch name and invoice printing setting.
- Provides the invoice scheme for automatic invoice numbering.
Press F3 to look up the value.
If a value is already selected, you can press F4 to open the record in its native editor.
The classification on the invoice type influences how the Recurring AR Invoice window behaves. The following table delineates that behavior:
| Charge |
The quantity on a new invoice detail line defaults to "1". |
| The total invoice amount must be positive. |
| Credit |
The quantity on the new invoice detail line defaults to "-1". |
| The total invoice amount must be negative. |
The GL control on the invoice type impacts the GL postings. The following table delineates that behavior:
| Debit AR, Credit Sales |
Debit Accounts Receivable and Cost of Goods Sold |
| Credit Sales (Revenue), Sales Tax Liability, and Inventory |
| Credit AR, Debit Sales |
Credit Accounts Receivable and Cost of Goods Sold |
| Debit Sales (Revenue), Sales Tax Liability, and Inventory |
Note
The invoice type on merged invoices can be changed if the classification on the new invoice type is the same as that of the original invoice type. In addition, if the invoice's GL entry is merged, the new invoice type's GL control must also be the same.
PO #
The customer's purchase order number that is associated with the recurring invoice.
Salesperson
The salesperson primarily responsible for the recurring invoice. The default salesperson comes from either the customer location or the customer (if no salesperson is specified on the location).
Press F3 to look up the value.
If a value is already selected, you can press F4 to open the record in its native editor.
Description
A description of the recurring invoice. This description is transferred to the invoice that results when the recurring invoice is processed. You can use literal text and/or keywords to derive the recurring invoice description.
Location
The customer location to associate with the recurring invoice. The default customer location is the customer's default location.
Selection of a customer location provides the following additional defaults for the recurring invoice:
- The destination tax entity defaults to the location's default tax entity.
- If a salesperson is specified on the location, the salesperson on the recurring invoice defaults to the location's default salesperson. If no salesperson is specified on the location, the salesperson on the recurring invoice defaults to the customer's default salesperson.
Press F3 to look up the value.
If a value is already selected, you can press F4 to open the record in its native editor.
Print Invoice
If this checkbox is marked, makes the invoices generated from this recurring invoice available for printing after they are merged. If you do not want to include the resulting invoices in standard print runs, ensure the checkbox is cleared. The default setting of this flag comes from the invoice type.
On Hold
If this checkbox is marked, puts the invoices generated from this recurring invoice on hold. Invoices on hold cannot be merged. To take an invoice off hold, clear the On Hold checkbox on the invoice record. You may want to use the Memo field to explain why the invoice is on hold and what actions need to be taken before the invoice can be merged.
Example
You can create a recurring invoice that generates "incomplete" invoices which require additional review and more information before being merged.
Allow Duplicates
If this checkbox is marked, allows multiple invoices to be generated for the recurring invoice in the same calendar period. Typically, you will want to leave the checkbox cleared so that ActivityHD can automatically prevent you from creating duplicate invoices.
Sales Tax
Origin
The tax entity for the location where the sale originated. The default tax entity is the default tax entity on the customer location.
You can change the origin tax entity at any time to generate accurate reporting. However, the sales tax amount on a merged invoice does not change because it represents the amount actually billed to the customer.
Press F3 to look up the value.
If a value is already selected, you can press F4 to open the record in its native editor.
Destination
The tax entity for the purchaser's location or the location where the purchase actually will be used. The default tax entity is the default tax entity on the invoice location, or the origin tax entity if a tax entity is not specified on the invoice location.
You can change the destination tax entity at any time to generate accurate reporting. However, the sales tax amount on a merged invoice does not change because it represents the amount actually billed to the customer.
Press F3 to look up the value.
If a value is already selected, you can press F4 to open the record in its native editor.
Source
The tax entity to use to calculate sales tax on the invoices generated from the recurring invoice. Your options are:
The default source is determined from the destination tax entity's sourcing options and whether the origin and destination tax entities are in the same state or different states.
You can change the source at any time to generate accurate reporting. However, the sales tax amount on a merged invoice does not change because it represents the amount actually billed to the customer.
Tax Entity
This field displays the tax entity, determined from the source tax entity, that is used to calculate sales tax and to determine reporting requirements for the invoices generated by the recurring invoice.
Press F3 to look up the value.
If a value is already selected, you can press F4 to open the record in its native editor.
Category
The customer tax category that applies to the recurring invoice. The customer tax category defaults from the category specified on the customer record. By default, all customers are considered taxable.
Customer tax categories are used to group customers for taxability and tax reporting. You can define customer tax categories to assign nontaxable status to certain groups of customers. You can also create taxable customer tax categories to group customers for tax reporting.
You can change the customer tax category at any time to generate accurate reporting. However, the sales tax amount on a merged invoice does not change because it represents the amount actually billed to the customer.
Press F3 to look up the value.
If a value is already selected, you can press F4 to open the record in its native editor.
Amount
The amount of sales tax calculated based on taxability and the effective tax rate on detail lines using today's date. The amount is an approximation for the recurring invoice. Taxable lines are summarized by tax rate. The total taxable amount is obtained by multiplying each distinct tax rate by the total amount for that tax rate.
Typically, the actual invoice sales tax amount is recalculated each time you run the Process AR Recurring Invoices wizard based on the generated invoice date.
If you need to override the calculated sales tax amount, enter the tax amount for the recurring invoice. The font color changes to purple to indicate a manual override. To revert to the calculated sales tax amount, blank out this field. When you leave the field, the calculated sales tax loads. If you do override the sales tax amount on a recurring invoice, the value you enter is used as the sales tax amount on all invoices generated from the recurring invoice—regardless of the sales tax rate in effect on the invoice date. The sales tax amount on generated invoices can be changed until the invoice is merged.
Note
Tax rates are date-driven. Since new tax rates take effect "as of" a particular date, a new tax rate does not affect the calculated tax on invoices posted before a tax rate's effective date.
General Ledger
AR Account
The receivables account to debit with the total invoice amount. The actual posting sign is controlled by the invoice type's GL control. The default account comes from applying the account masks from the invoice type, attribute items, customer, and customer class. If any of these account masks change, the default account updates accordingly unless the account number is overridden.
Overridden accounts display in purple. ActivityHD does not replace an override account with the default account. If you need to revert to the default account, blank out the field. When you leave the field, the default account loads.
GL Batch
The name of the GL batch to use for the GL entry that is created when an invoice generated from the recurring invoice is merged. The GL batch is used to create and to find the GL entry for the resulting invoice when the invoice is merged. Specify different GL batch names on different invoices to summarize them into different GL entries. This field defaults to the GL batch name on the invoice type.
You can change the GL batch on an invoice even after it is merged as long as the GL entry has not been merged. If you do so, the invoice's GL detail is "moved" to the new GL entry.
GL Date
The type of date to use to determine the GL date on the invoice generated from the recurring invoice. Your options are:
- Invoice Date. Set the GL date to the same date as the invoice date.
- Period End Date. Set the GL date to the last day of the period that contains the invoice date.
Sales Tax Detail
Rates button
Click this button to open the Sales Tax Rates popup. For each tax entity on the recurring invoice, the table in the popup shows the tax rate, the taxable basis, and the calculated tax. The table also shows the total rate and total calculated tax for all tax entities on the recurring invoice.
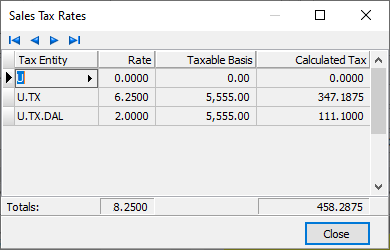
Sales Tax Detail table
This table contains a detail line for each tax entity affected by the recurring invoice. Unless you need to override amounts or accounts, you can skip this table.
Tax Entity
The tax entity associated with the detail line.
Press F3 to look up the value.
If a value is already selected, you can press F4 to open the record in its native editor.
Amount
The calculated sales tax amount for the corresponding tax entity. The amount comes from the sales tax amounts on the recurring invoice detail lines.
If you override a tax amount, the new amount displays in purple and the Amount field in the Sales Tax section is updated to reflect the new tax total.
Account
The tax liability account for the sales tax on the recurring invoice. The default account is derived from the account masks on attribute items and the tax entity.
If you override the tax liability account with a valid account, the new account displays in purple. If you need to revert to the default account, blank out the field. When you leave the field, the default account loads.
Press F2 to open the Account Expand dialog box where you can look up an account number, find an account number by its alias, build the account number by segment, or view setup and setup sources.
Press F3 to look up the account.
If an account is already selected, you can press F4 to open the record in the Account window.
Attributes
One field, labeled with the attribute name, appears in this section for each active attribute with AR invoice usage.
[Attribute Name]
The attribute item that applies to the invoices generated from the recurring invoice. If the attribute is a required attribute, you must select an attribute item.
Attribute items provide additional ways to categorize invoices for reporting and they can contribute to the GL account masks used to derive the GL accounts used during invoice posting.
Press F3 to look up the value.
If a value is already selected, you can press F4 to open the record in its native editor.
Payment Terms
Use this section to specify the payment terms, finance method, and discount basis to apply on invoices generated from the recurring invoice.
Terms
The payment terms to apply to the invoices generated from the recurring invoice. This field defaults to the payment terms from the recurring invoice customer. If you specify payment terms on the recurring invoice, the due date and discount detail are automatically calculated on the invoices generated from the recurring invoice.
Leave this field blank if you want to select payment terms on the generated invoices or if you want to leave the Terms field on generated invoices blank and enter the due date and discount details instead.
Press F3 to look up the value.
If a value is already selected, you can press F4 to open the record in its native editor.
Finance
The finance method to use to calculate finance charges on an invoice generated from the recurring invoice if it becomes past due. The default finance method is the recurring invoice customer's default finance method.
Leave this field blank to select the finance method on the generated invoices or to exclude generated invoices from finance charges altogether.
Press F3 to look up the value.
If a value is already selected, you can press F4 to open the record in its native editor.
Basis
The amount of the recurring invoice that is subject to discount. The basis amount is calculated as detail lines are added to the recurring invoice. The ARCode on each detail line determines whether its amount is added to the basis.
If you need to override the basis amount on the recurring invoice, enter the actual discount basis amount. The override amount displays in purple. ActivityHD does not replace an override amount with the system-calculated basis amount even when the invoice detail changes. If you need to revert to the system-calculated basis amount, blank out the field. When you leave the field, the system-calculated basis amount loads.
Detail table
The columns in the Detail table depend on your recurring invoices options settings. The columns available when you use the system default settings are shown above the dark green line. The remaining columns that can be added to the table are shown below the line.
Use the Detail table to add detail lines for the items you want to include on the invoices generated from the recurring invoice.
Tip
Line numbers in the Detail table are editable. You can change the line numbers in order to reorder the rows in the table.
ARCode
The ARCode that applies to the detail line. The ARCode categorizes the recurring invoice detail line for reporting and provides information for deriving the GL account numbers, calculating sales tax, and calculating payment discounts.
The sales, cost, and inventory accounts on the detail line are derived by applying account masks from the following sources in the following order: ARCode, attribute items (last to first), customer, customer class.
Press F3 to look up the value.
If a value is already selected, you can press F4 to open the record in its native editor.
Description
A description of the detail line. The detail description defaults to the description from the ARCode. Press F2 to access the Detail Description popup which makes it easier to enter a long description.
If you override the default description, the new description displays in purple. If you need to revert to the original description, blank out the cell. When you leave the cell, the default description loads.
Amount
The extended amount for the detail line. ActivityHD automatically calculates the amount when there are values in the Quantity, Unit Price, and Discount columns.
Amount = (Quantity * Unit Price) - Discount
If you enter a manual amount in this column, ActivityHD automatically adjusts the unit price if the quantity and discount values are provided.
Tax Category
The item tax category for the detail line. The tax category defaults from the tax category on the ARCode, but can be overridden.
Item tax categories group ARCodes for taxability and tax reporting. By default, all ARCodes are considered taxable. You can define item tax categories to assign nontaxable status to groups of ARCodes. You can also define taxable item tax categories to group ARCodes for tax reporting.
Press F3 to look up the value.
If a value is already selected, you can press F4 to open the record in its native editor.
Taxable?
This column indicates the taxability of the recurring invoice detail line. The state of the checkbox (marked or unmarked) is controlled by the customer tax category on the recurring invoice and/or the item tax category on the detail line.
If the checkbox is marked, the detail line is subject to tax. If the checkbox is unmarked, the recurring invoice is considered nontaxable. By default, detail lines are considered taxable unless there is a nontaxable customer tax category on the recurring invoice or a nontaxable item tax category on the detail line. So, if a tax category is not assigned to either the recurring invoice or the detail line, the detail line is deemed taxable.
Sales Account
The sales account (or "revenue" account) that is credited with the extended amount for the detail line in the associated GL entry. The posting sign on the entry is controlled by the GL control setting on the invoice type. The default account is derived by applying account masks from the following sources in the following order: ARCode, attribute items (last to first), customer, customer class. If any one of the account masks changes, the sales account is updated unless the default account is overridden.
If the sales account is not fully qualified or if the account does not exist, its background is shaded yellow. You should replace any wildcarded characters with valid entries. If you override a valid account number with a different valid account number, the new account number displays in purple. If you need to revert to the original account, blank out the cell. When you leave the cell, the default account loads.
Press F2 to open the Account Expand dialog box where you can look up an account number, find an account number by its alias, build the account number by segment, or view setup and setup sources.
Press F3 to look up the account.
If an account is already selected, you can press F4 to open the record in the Account window.
Sales Account Description
The description of the selected sales account.
[Attribute Name]
One column displays in the table for each active attribute with AR invoice detail usage (if any). The column(s) contain the attribute value(s) assigned to each recurring invoice detail line. The attribute values are provided to invoice detail lines through Process AR Recurring Invoices.
Memo
Enter additional information about the detail line if needed. Press F2 to access the Detail Memo popup which makes it easier to enter a long memo.
ARCode Description
The description of the ARCode assigned to the detail line.
Cost
The total cost for the recurring invoice detail line, or enter zero if there is no cost associated with the detail line. If the cost is not zero, the amount is typically debited to the cost account and credited to the inventory account. The posting sign on the entry is controlled by the GL control on the invoice type.
Cost Account
The cost account (or "cost of goods sold" account) that is debited with the cost from the detail line (if non-zero) in the associated GL entry. The posting sign on the entry is controlled by the GL control setting on the invoice type. The default account is derived by applying account masks from the following sources in the following order: ARCode, attribute items (last to first), customer, customer class. If any of the account masks change, the cost account is updated unless the default account is overridden.
If the cost account is not fully qualified or if the account does not exist, its background color is shaded yellow. You should replace any wildcarded characters with valid entries. If you override a valid account number with a different valid account number, the new account number displays in purple. If you need to revert to the original account, blank out the cell. When you leave the cell, the default account loads.
Press F2 to open the Account Expand dialog box where you can look up an account number, find an account number by its alias, build the account number by segment, or view setup and setup sources.
Press F3 to look up the account.
If an account is already selected, you can press F4 to open the record in the Account window.
Cost Account Description
The description of the selected cost account.
Discount
The line item discount amount for the detail line. The default value is zero, but you can enter a value in this column if you want to represent the discount separately from the standard unit price.
If you enter a different value, ActivityHD calculates a new amount provided there are values for quantity, unit price, and discount. If the discount amount causes the amount to have a different numeric sign than the quantity, ActivityHD returns one of the following errors:
- If Amount is negative, Quantity cannot be positive.
- If Amount is positive, Quantity cannot be negative.
The error condition is caused by the discount amount exceeding the extended amount of the recurring invoice detail line before the discount is applied.
If you want ActivityHD to calculate the discount automatically, blank out this field, then enter values for the quantity, unit price, and amount.
Discount = (Quantity * Unit Price) - Amount
Inventory Account
The inventory account that is credited with the cost for the detail line (when non-zero) in the associated GL entry. The posting sign on the entry is controlled by the GL control setting on the invoice type. The default account is derived by applying account masks from the following sources in the following order: ARCode, attribute items (last to first), customer, customer class. If any of the account masks changes, the inventory account is updated unless the default account is overridden.
If the default account is not fully qualified or if the account does not exist, its background is shaded yellow. You should replace any wildcarded characters with valid entries. If you override a valid account number with a different valid account, the new account number displays in purple. If you need to revert to the original account, blank out the cell. When you leave the cell, the default account loads.
Press F2 to open the Account Expand dialog box where you can look up an account number, find an account number by its alias, build the account number by segment, or view setup and setup sources.
Press F3 to look up the account.
If an account is already selected, you can press F4 to open the record in the Account window.
Inventory Account Description
The description of the selected inventory account.
Quantity
The number of units for the detail line. This field defaults to "1" for charge invoices and to "-1" for credit invoices.
If you change the quantity, the system recalculates the detail line amount as long as there are values for the quantity, unit price, and discount. If you want ActivityHD to calculate the quantity for you, blank out the entry in the Quantity column and enter values for the unit price, discount, and detail line amount. ActivityHD calculates the quantity based on the following formula:
Quantity = (Amount + Discount) / Unit Price
When the detail line amount is entered, the quantity's numeric sign changes to match the sign of the detail line amount.
Tax Rate
If the detail line is taxable, this field displays the effective tax rate for the invoice tax entity as of today's date. The effective tax rate is recalculated when a recurring invoice is processed based on the invoice date on the generated invoice.
ActivityHD calculates the total sales tax for the recurring invoice automatically based on the taxable status of each detail line and on the effective tax rates of each detail line. Taxable lines are summarized by tax rate; the total taxable amount is determined by multiplying each distinct tax rate by the total for the rate.
Unit Price
The price per unit of the item sold. The unit price cannot be negative. A unit price may have up to four places after the decimal.
If you enter a unit price, ActivityHD calculates the detail amount as long as there are values for quantity, unit price, and discount.
If you change the amount on the detail line and there are values for quantity and discount, ActivityHD recalculates the unit price using the following formula:
Unit Price = (Amount + Discount) / Quantity
Initial Payment(s) table
The columns in the Initial Payment(s) table depend on your invoice options settings. The columns available when you use the system default settings are shown above the green line. The remaining columns that can be added to the table are shown below the line.
Use this table to record payments to be automatically applied when an invoice is generated from the recurring invoice.
Tip
Line numbers in the Initial Payment(s) table are editable. You can change the line numbers in order to reorder the rows in the table.
Deposit Type
The type of deposit to assign to the initial payment.
If the initial payment is associated with a deposit, you can enter a deposit type here to let ActivityHD automatically determine the applicable deposit based on the deposit type and GL receipt date. If a deposit in "New" status already exists for the deposit type and GL receipt date, that deposit is used on the initial payment. If such a deposit does not exist, ActivityHD creates it and associates it with the initial payment.
If, on the other hand, a deposit was assigned to the initial payment, the deposit type is set from that deposit.
Note
The deposit type and receipt type are validated against each other. If a deposit type is selected that has only one receipt type associated with it, that receipt type defaults into the Receipt Type column. If a receipt type is already on the detail line and you enter a deposit type that is not associated with the receipt type, ActivityHD blanks out the Receipt Type column and you will need to select a compatible receipt type.
Press F3 to look up the value.
If a value is already selected, you can press F4 to open the record in its native editor.
Receipt Type
The receipt type for the initial payment.
The receipt type provides the following functions:
- Categorizes receipts for reporting.
- Classifies receipts as cash, check, credit card, collapsed, or other.
- Determines valid deposit types.
- Determines if a deposit is required.
- Allows an optional receipt reference to be specified.
You can change the receipt type even on merged invoices as long as the change does not violate any of the restrictions on the deposit.
Note
The deposit type and receipt type are validated against each other. If a deposit type is selected that has only one receipt type associated with it, that receipt type defaults into the Receipt Type column. If a receipt type is already on the detail line and you enter a deposit type that is not associated with the receipt type, ActivityHD blanks out the Receipt Type column and you will need to select a compatible receipt type.
Press F3 to look up the value.
If a value is already selected, you can press F4 to open the record in its native editor.
Reference
Enter a brief note to help users identify the receipt. If a reference was specified on the receipt type, that reference defaults here.
Examples
For checks, you can use the check number.
For cash receipts, you can simply enter "CASH".
Payment
The amount of the initial payment. If you press Ctrl+B or select  > Tools > Pay Balance, the payment amount defaults to the open balance of the recurring invoice.
When an invoice generated from the recurring invoice is merged and the journal entry is created for the initial payment, the payment amount is used to make the following type of entry:
DR Bank Account (on initial payment line)
CR AR Account (on invoice)
Description
Enter a description of the receipt.
Bank Account
If the initial payment is associated with a deposit, the bank account is the bank account assigned to the deposit. In this case, the bank account can only be changed by changing the deposit on the initial payment.
If the initial payment is not associated with a deposit, you must specify the bank account here. If a bank account is specified on the receipt type, that bank account defaults here. The bank account can also default from options settings. As long as the initial payment is not associated with a deposit, you can change the bank account if needed.
Press F2 to open the Account Expand dialog box where you can look up an account number, find an account number by its alias, build the account number by segment, or view setup and setup sources.
Press F3 to look up the account.
If an account is already selected, you can press F4 to open the record in the Account window.
Custom tab
This tab is visible if custom fields exist for the entity. At a minimum, if there are custom fields, a Fields subtab will be present. One or more additional categories of subtabs may also be visible.
Fields subtab
This tab prompts for values for any custom fields set up for entity records of this entity type. Respond to the prompts as appropriate.
References subtab
This tab is visible if other records reference the current record.
Reference
From the drop-down list, select the custom field to view references for. Reference custom fields have the following format: PackageName.EntityName.CustomFieldName.
Example
Suppose a custom field exists on PRCodes that references an ARCode. On the ARCode record, on the Custom > References subtab, you can view all the PRCodes which reference that ARCode.
Exchange Folder subtab
This tab is visible only if you set up a custom field with a data type of "Exchange Folder". The label on this tab is the name assigned to the custom field.
This tab shows the contents of the specified Exchange folder.
File subtab
This tab is visible only if you set up a custom field with a data type of "File". The label on the tab is the name assigned to the custom field.
This tab renders the contents of the specified file according to its file type.
Internet Address subtab
This tab is visible only if you set up a custom field with a data type of "Internet Address". The label on this tab is the name assigned to the custom field.
This tab shows the contents of the specified web page.
Network Folder subtab
This tab is visible only if you set up a custom field with a data type of "Network Folder". The label on this tab is the name assigned to the custom field.
This tab shows the contents of the specified network folder.
Invoices tab
The Invoices pane shows the AR Invoices HD view filtered to show all invoices generated from the selected recurring invoice.
Double-click a row in the pane to drill down to its record in the AR Invoice window.
Notes tab
The Notes pane shows the Notes HD view filtered to show all notes for the selected recurring invoice.
Double-click a row in the pane to drill down to its record in the Note window.
The Attachments tab is visible if any record for a given entity has an attachment. If the Attachments tab is not visible, this implies that no record of the entity type has an attachment on it; however, once an attachment is added to any record of the entity type, the Attachments tab will become available.
Attachments
The list box shows the files which are attached to the current record. Highlight a file name to preview the file in the adjacent pane. Double-click a file name to open the file in its native editor.
Preview pane
If a file name is highlighted in the Attachments list box, this pane shows a preview of the file contents. Some file types cannot be previewed but can be double-clicked to open in their native editor.
Change Logs tab
This tab is visible if the user has "Change Logs" access to the associated data folder resource.
The Change Logs pane shows the Change Logs HD view filtered to show all change logs for the selected entity record.
Double-click a row in the pane to drill down to its record in the Change Log window.
Other tab
Memo tab
To include additional information about this record not collected elsewhere, enter it in this text box. This area supports common keyboard shortcuts such as Ctrl+C to copy and Ctrl+V to paste.
Timestamps tab
This tab shows the user who created this record and the date and time of creation as well as the user, date, and time of the latest modification to the record.
Developer tab
This tab is visible only when developer features are enabled.
Automation subtab
This subtab shows field names and values for the current data record. Use the information in the subtab to assist when creating automation objects such as bots and import files. The field names and field values can be copied from the text box and pasted directly into your code or application. To copy content from the text box, highlight the content to copy and press Ctrl+C or right-click your selection and select Copy from the context menu.
Export (XML | JSON) subtab
This subtab shows the XML syntax for exporting the selected data record. The syntax can be copied from the text box as an exemplar for creating your own automation objects for bots, import files, ActivWebAPI, etc. To copy content from the text box, highlight the content to copy and press Ctrl+C or right-click your selection and select Copy from the context menu.
Import (XML | JSON) subtab
This subtab allows you to select a file for import and shows the XML syntax for importing data records. Use the subtab to explore the XML syntax for importing data records. In particular, you can investigate the syntax which results when using Data.Import and ActivWebAPI data POST and DELETE routes.
Change Log (XML | JSON) subtab
This subtab is visible only when the Enable Change Logs option is marked in System Options or Company Options (depending on whether the feature applies at the system or the company level). This is the default setting when developer features are enabled.
This subtab allows you to investigate changes to the current data record. The syntax can be copied for use in bots, dashboards, ActivWebAPI, and other automation. To copy content from the text box, highlight the content to copy and press Ctrl+C or right-click your selection and select Copy from the context menu.
Select Statement (SQL) subtab
This subtab allows you to investigate the SQL select statement used to retrieve the current data record. The syntax can be copied as an exemplar for data sources and other automation. To copy content from the text box, highlight the content to copy and press Ctrl+C or right-click your selection and select Copy from the context menu.
 Create recurring AR invoices
 . The New Recurring AR Invoice window opens.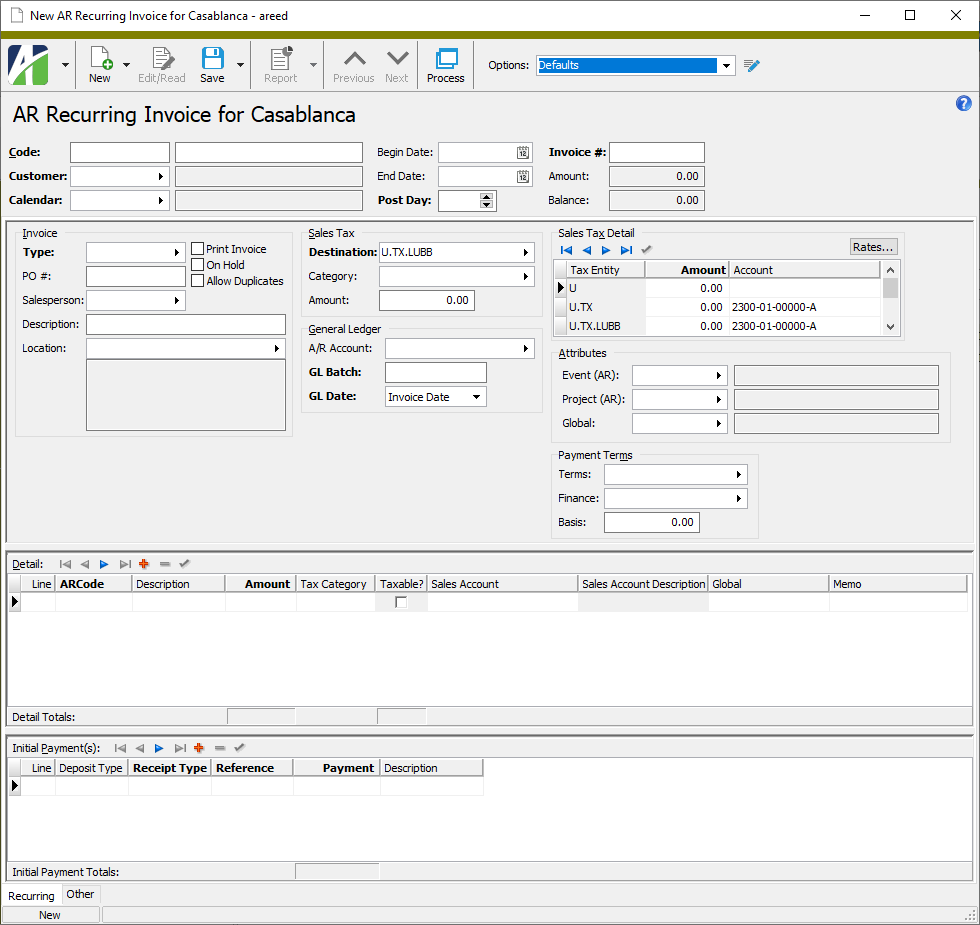
 > Tools > Pay Balance to have
  , or open the invoice and select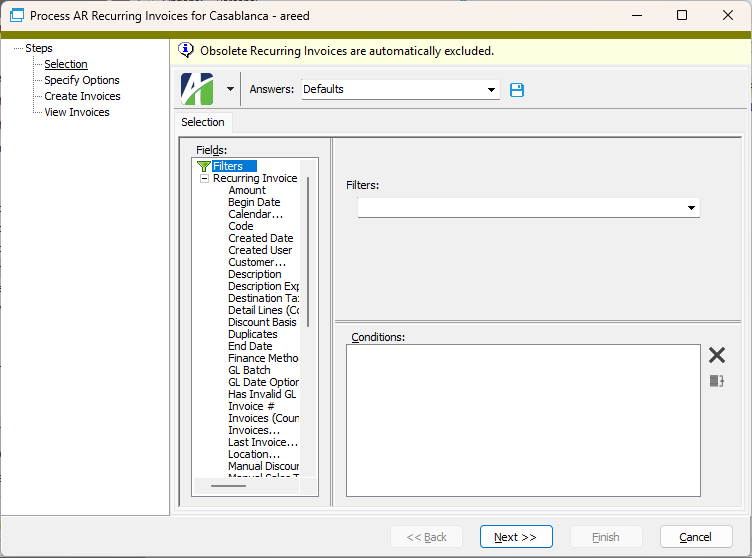
 .
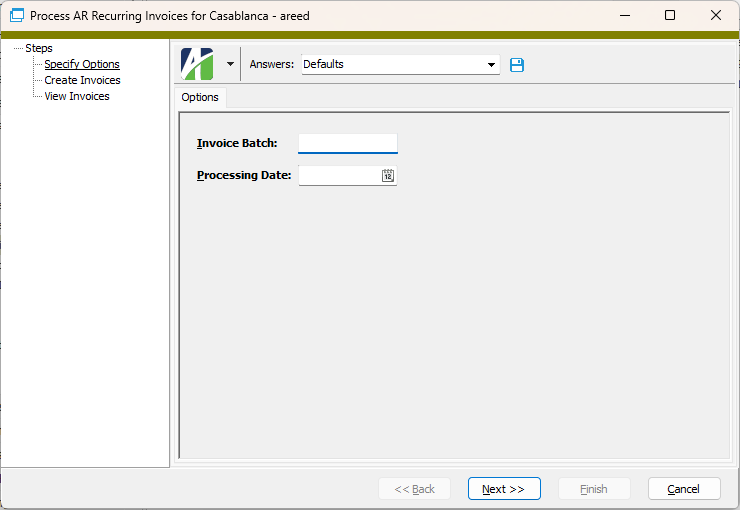
.
 .
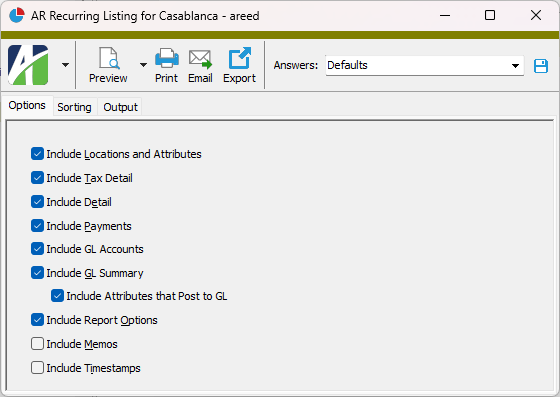
.
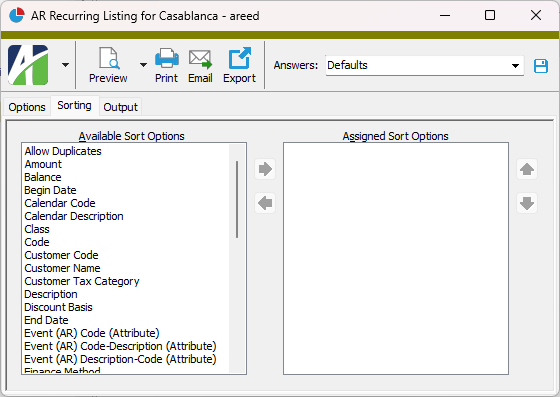
 to move your selection(s) to the Assigned Sort Options list box.
 and
and  to arrange the sort fields in the order you want them applied.
 - Provides access to two preview options.
 - Opens the Print dialog so that you can select and configure a printer and then print a paper copy of the report.
 - Opens the
  - Opens a drop-down menu with two export options: