Pay lines are check lines which add to the amount of the check.
Deduction lines and tax lines subtract from the check amount if they are the employee's responsibility. They have no effect on the check amount if they are the employer's responsibility.
Statistic lines do not affect the check amount.
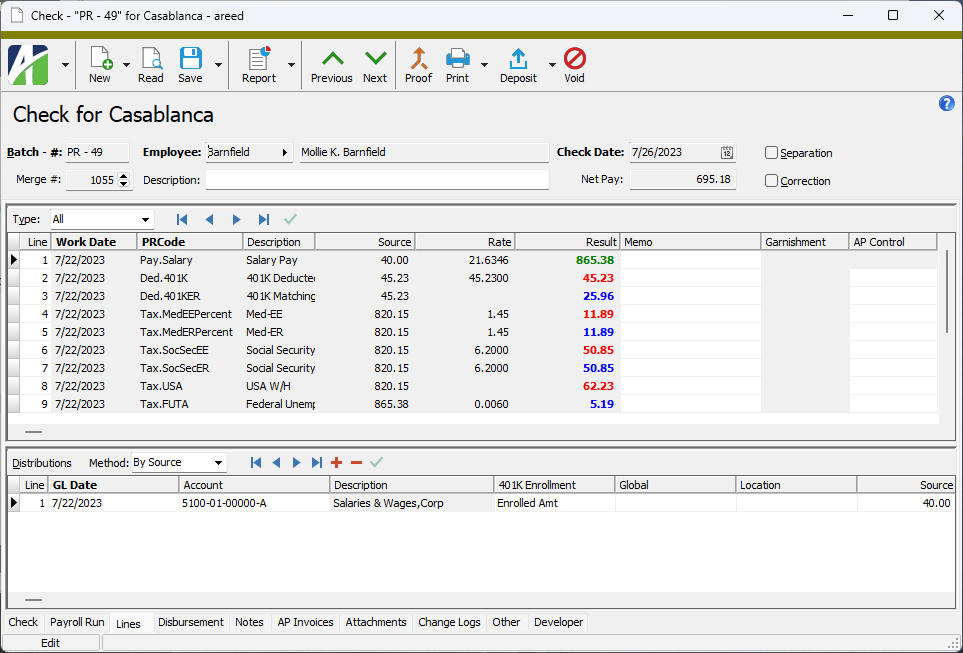
From a high level view, check lines contain a source amount, a rate (optional), and a result amount in dollars. The source amount can store such things as hours worked, number of items produced, or the amount of wages on which a calculation is based. The rate may contain pay rates, piece rates, deduction percentages, or tax percentages. The result amount is calculated from the source amount. Sometimes the calculation is as simple as the source amount times the rate; other times, the source amount serves as input for a complicated tax formula or calculation expression.
Calculation expressions facilitate check line calculation. Calculation expressions are similar to the formulas you see in spreadsheets. For any check line, there can be three calculation expressions: one for the source, one for the rate, and one for the result. The expressions perform mathematical operations based on the current check line, on other check lines, and on historical totals. Special functions are used to calculate taxes or garnishments.
Oftentimes a calculation expression needs a total from groups of other check lines. You can define check line groups for this purpose and assign relevant segment items to the group.
Example
Medicare Gross is the total of all compensation pay lines minus the total amount of employee deductions which are not subject to Medicare tax. So, in this case, you can define a Compensation group and assign the applicable pay lines to the group. You can also define a PreMedicare group and assign the deduction lines which reduce Medicare wages to it. The source expression for the Medicare tax line would then be:
Compensation - PreMedicare
Calculation expressions can refer to parameters. Parameters are variables that you define to help you calculate a check line. Parameters can represent numbers (salaries, rates, multipliers, percentages, number of exemptions), alphanumeric codes (tax filing status, garnishment table code), dates, or yes/no answers (exempt from Social Security?, exempt from Medicare?). Some commonly used parameters are built in to ActivityHD; others are user-defined. You can define as few or as many parameters as you need and you can refer to them however you want.
Values are assigned to parameters. A value can be specific to a particular employee (e.g., salary amount) or can be global (e.g., the Medicare withholding rate). You can also set up values that are nearly global but can be overridden in employee-specific cases. Parameter values are date-driven, so you can enter values in advance and have them take effect later. This characteristic of parameter values helps prevent last-minute payday changes.
Parameter values can be based on the check date or the work date. The work date is assigned to pay lines and is a date within the current pay period. The default work date is the pay period end date. Because you can specify multiple pay lines with different work dates, you can access more than one value for the same parameter within a pay period.
Example
Suppose an employee receives a pay raise during a pay period. The employee works the first two days of the week at the old pay rate and the last three days at the new rate. If the rate parameter is based on work date and you have entered both rates with appropriate effective dates, then entering a correct work date causes ActivityHD to retrieve the correct rates automatically.
Most check lines result in postings to at least one GL account. Pay lines can be distributed to one or more GL accounts so that you can break down pay by department or project. Furthermore, pay lines can be distributed to one or more GL periods (split period). A distribution line includes a distribution date, a GL account, a source amount, and a result amount. The distribution date defaults to the work date on the pay line. If the GL account needs to be qualified by department or project, you can provide the missing values in the account mask. The total distributed amount must match the result amounts on the pay line.
Check lines which represent an expense (e.g., employer deduction lines, employer tax lines, statistic lines, other pay lines) can be marked as "follows pay". "Follows pay" check lines are automatically distributed to the same departments or projects and in the same proportion (based on result amounts) as the group of pay lines they follow. You cannot change the distribution lines on a "follows pay" distribution.
Up until the check containing it is merged, most of a check line's fields can be changed. After the check is merged but before its GL entry is merged, the AP Control, Distribution Method, Liability Date, and Memo fields may be editable (depending on the PRCode type). After the GL entry is merged, only the AP Control, Distribution Method, and Memo fields may be editable.
To maintain a check line:
Maintain a check line
In the Navigation pane, highlight the Payroll/Human Resources > Checks > Check Lines folder.
In the HD view, locate and double-click the check line you want to maintain to load it in the Check Line window.
Perform only the steps you need to update the check line. The steps that follow describe all fields which may be enabled before the check containing the check line is merged. If the check has been merged or if the GL entry has been merged, fewer fields are available for data entry.
In the Work Date field, enter the work date for the check line. The work date must fall in the pay period defined on the payroll run. Typically, the work date is the last day of the pay period; however, the work date can be any day in the period.
Example
If an employee's pay rate changed during the pay period, your entry could have a different work date within the pay period.
The Source, Rate, and Result fields are conditionally enabled depending on the requirements of the PRCode. Enter the appropriate value(s) for the check line.
Note
If you need to override the value in one of these fields and it is disabled, place your cursor in the field and select > Tools > Unlock Source/Rate/Result or press Ctrl+Alt+U to unlock the field for data entry.
In the PRCode field, select the PRCode to use to calculate this check line.
If this check line represents a garnishment, the Garnishment field is enabled. Select the garnishment record associated with this check line.
If you have the Payroll to AP interface enabled, the AP Control field is visible. If an AP invoice will be generated to pay this check line, select the AP control to use.
If the PRCode for the check line represents a deduction or tax, the Liability Date field is enabled. Enter the date to post the GL liability entry for this check line. Typically, this is either the check date or the work date. The default liability date type (check date, work date) can be set at the segment item level.
Note
If you override the date in this field, but the liability date source is "Check Date" or "Work Date" and the check date or work date, respectively, changes, the date is replaced by the new check date or work date.
The Credit Account field becomes enabled if the account is not fully qualified or does not exist and the value is corrected on the source entity or if you select > Tools > Unlock Credit Account or if you press Ctrl+Alt+U to unlock the field for data entry. Select the liability credit account for the check line.
If the check line is a pay line or an employer-side deduction or tax line, the Distribution Method field is enabled. The field is disabled if the check line comes from a voided or reversal check. From the drop-down list, select how to distribute the check line. Your options are:
By Source. The account number is determined from the PRCode, the employee, or both.
Follows Pay. Distributions are automatically generated for selected PRCodes. The distributions are proportional to the distributions for a selected group of other check lines. "Follows Pay" is defined on the PRCode segment item.
Manual. Account numbers are entered manually.
Split Period. The distribution splits the check line between two GL periods.
In the Memo field, enter any additional information you want to record about the check line. If the check line was created as a result of processing time sheets, the default memo was copied from the memo on the corresponding time sheet line.
Post to AP is only available if the Payroll to AP interface is enabled.
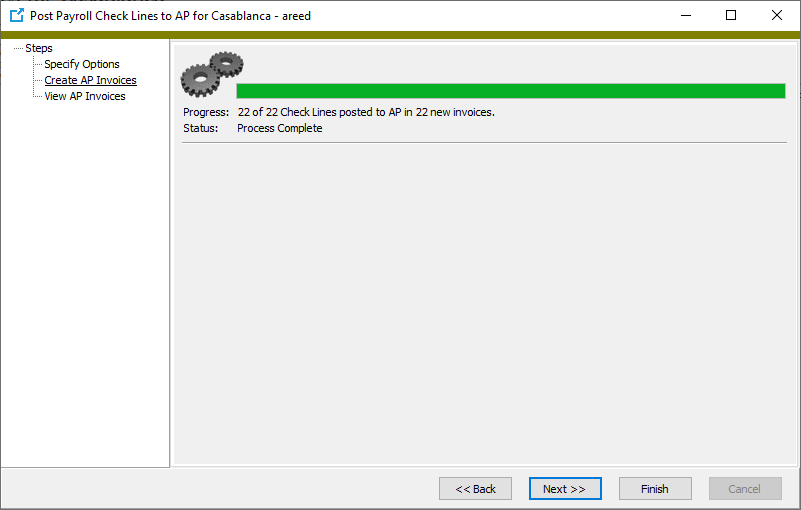
The Post to AP process takes payroll check lines, transforms them into invoices, and posts the invoices to AP. The process occurs in four steps:
Select the check lines to post.
Note
Post to AP only processes check lines with an AP control assigned to them.
Note
The Post to AP process allows you to select zero amount check lines for posting to AP. This allows you to see all the employee taxes and deductions that were considered for an AP payment. This ability is useful because it reassures you that employees with zero amount check lines were not accidentally skipped.
Specify options for your selections.
Create and post AP invoices.
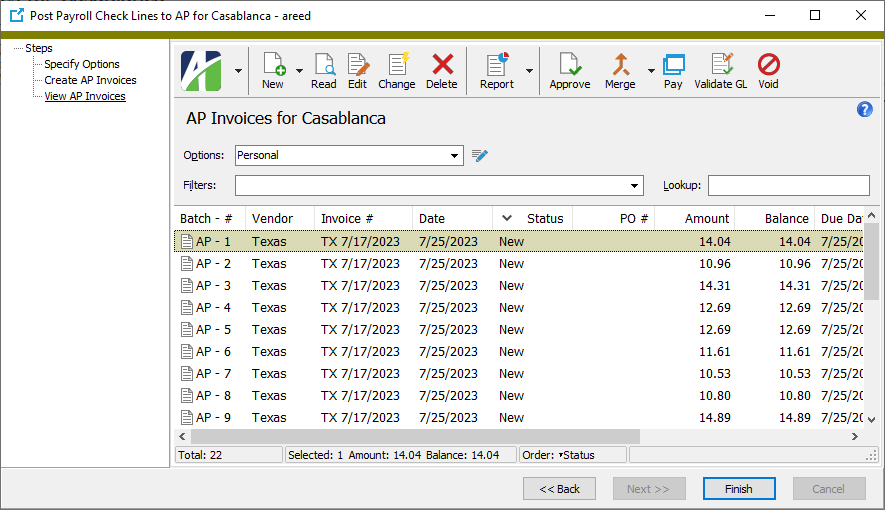
View AP invoices.
You can merge and pay the AP invoices from the "View AP Invoices" page of the Post Payroll Check Lines to AP wizard, or you can merge and pay the invoices later in Accounts Payable.
To post check lines to AP:
Post check lines to AP
In the Navigation pane, highlight the Payroll/Human Resources > Checks > Check Lines folder.
Start the Post Payroll Check Lines to AP wizard.
To process all or a filtered subset of check lines:
Right-click the Check Lines folder and select Select and Post to AP from the shortcut menu.
On the Selection tab, define any filters to apply to the data.
Tip
Apply the "Ready to Post to AP" filter to select check lines that have an AP control, are merged, are not voided, and have not already been posted to AP.
Click Next >>.
To process specifically selected check lines:
In the HD view, select the check lines to include in the process. You can use Ctrl and/or Shift selection to select multiple records.
Tip
Apply the "Ready to Post to AP" filter to see all check lines that have an AP control, are merged, are not voided, and have not already been posted to AP.
Click .
To process a particular check line from the Check Line window:
In the HD view, locate and double-click the check line to process. The Check Line window opens with the check line loaded.
Click .
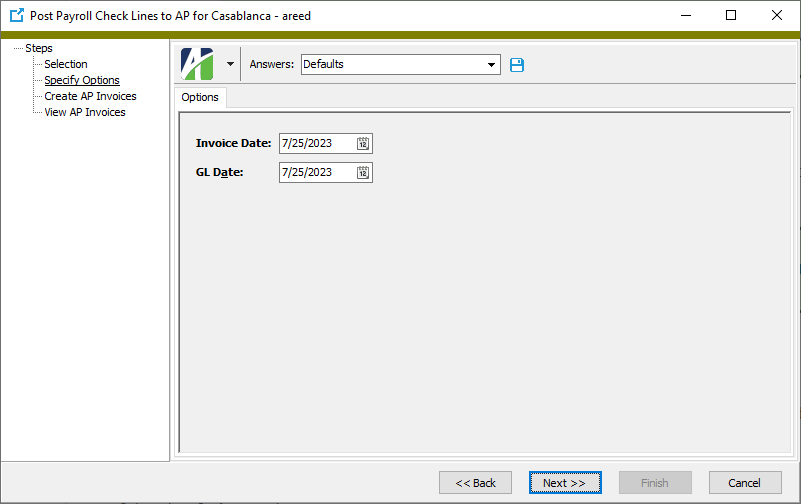
Select the Options tab.
In the Invoice Date field, enter the date to print on the invoices.
In the GL Date field, enter the date to post transactions to the general ledger.
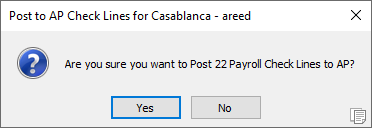
Click Next >>. ActivityHD prompts you to confirm that you want to post the check line(s) to AP.
Click Yes. ActivityHD creates the appropriate invoices and posts them to AP.
Click Next >>. At this point you can view the invoices created. From this view page you can also proof, merge, and pay the invoices if desired.
Investigate how the values on a check line are calculated
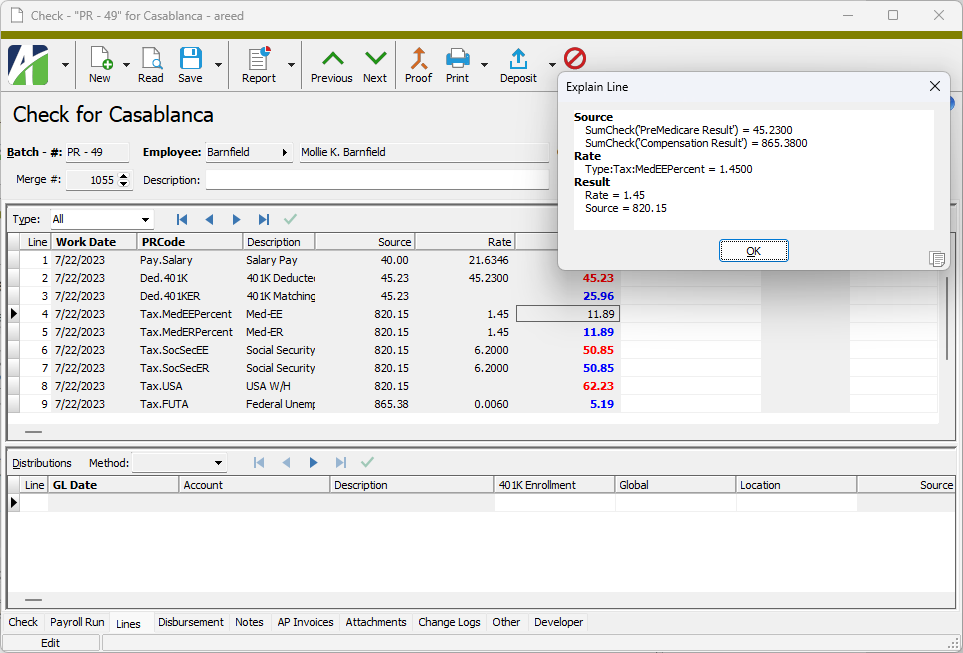
The Explain Line feature introduced in ActivityHD 9.21-0 provides insight into how the check calculator determines the values for the Source, Rate, and Result on a check line.
To investigate the values on a check line:
Open the check to investigate.
Select the Lines tab.
Locate the check line to investigate and click in the Source, Rate, or Result column for that line.
Press F2 or select > Tools > Explain Line from the menu. A message box opens with an explanation of the calculation.
When you finish inspecting the components of the calculation, click OK to dismiss the message box.
Important!
Because intermediate values are not stored with a check, the message shows current values, or the values you would get if you recalculated the check. The Explain Line tool is especially useful when creating checks or testing new features.
Example
If the Result expression is "Source * Rate", the displayed values do not necessarily match the Source and Rate of the check line but instead match what the Source and Rate would be if they were recalculated.
Notes
Arithmetic operators and constants are not shown.
Values are listed more than once if the values are calculated more than once in the expression.
Amounts are shown with four decimal places since that is how the value is stored internally. Exceptions: Source and Rate reflect the scale defined on the PRCode.
Click here for a list of values which can display in the Explain Line message box if applicable.
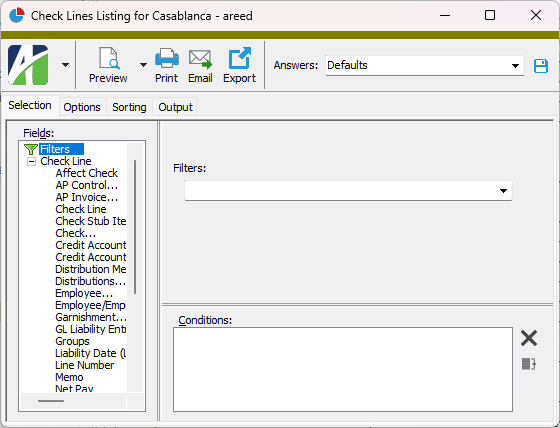
The Check Lines Listing provides a list of check lines recorded in Payroll.
Content
For each check line included on the report, the listing shows:
PRCode and description
batch - entry number
for garnishments, the garnishment record number
work date
source
rate
result.
In addition, you can include:
memos.
The following totals appear on the report:
employee totals (check line count, pay, deductions, tax, source, result) or PRCode totals (check line count, source, result)
report totals (check line count, pay, deductions, tax, source, result).
Print the report
In the Navigation pane, highlight the Payroll/Human Resources > Checks > Check Lines folder.
Start the report set-up wizard.
To report on all or a filtered subset of check lines:
Right-click the Check Lines folder and select Select and Report > Check Lines Listing from the shortcut menu.
On the Selection tab, define any filters to apply to the data.
To report on specifically selected check lines:
In the HD view, select the check lines to include on the report. You can use Ctrl and/or Shift selection to select multiple records.
Click and select Check Lines Listing from the drop-down menu.
To report on a particular check line from the Check Line window:
In the HD view, locate and double-click the check line to report on. The Check Line window opens with the check line loaded.
Click and select Check Lines Listing from the drop-down menu.
Select the Options tab.
In the Group By field, select how to group check lines on the report. Your options are:
Employee
PRCode
In the Include field, select the information to include on the report. Your options are:
Detail
Totals Only
In the Employee Order field, select the sort order for employee records on the report. Your options are:
Code - Base the sort order on the employee code.
First Name First
Last Name First
To include a section at the end of the report with the report settings used to produce the report, leave the Include Report Options checkbox marked. To produce the report without this information, clear the checkbox.
To include check line memos on the report, mark the Include Memos checkbox.
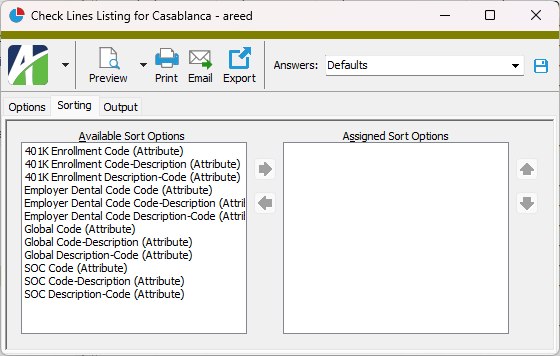
Select the Sorting tab.
In the Available Sort Options list box, highlight the field(s) to sort the report by, then click to move your selection(s) to the Assigned Sort Options list box.
If you selected multiple sort fields, use and to arrange the sort fields in the order you want them applied.
Select the Output tab.
In the Design field, look up and select the report design to use.
In the toolbar, click the icon for the type of output you want:
- Provides access to two preview options.
Preview - Click the icon or click the drop-down arrow and select Preview from the drop-down menu to view the report in the Crystal Reports viewer.
Preview to PDF - Click the drop-down arrow next to the icon and select Preview to PDF to view the report in the PDF reader.
- Opens the Print dialog so that you can select and configure a printer and then print a paper copy of the report.
- Opens the Report Email dialog so that you can address and compose an email that the report will be attached to. For best results, ensure your email client is running before you attempt to send a report via email.
- Opens a drop-down menu with two export options:
Export Report - Opens a dialog so that you can save the report to a file. File types include Crystal Reports (.rpt), PDF (.pdf), Microsoft Excel (.xls), Microsoft Word (.doc), rich text (.rtf), and XML (.xml).
Export Data - Opens a dialog so that you can export report data to XML or JSON file format.
From
The email account from which to send the email. Valid options are:
Windows user default account. Sends email using the user's Windows default email account. For most users, this is the account configured in Outlook or another email client application.
Server personal. Sends email using the email configuration for the system or company server and the email address on the current user's authorized user record. The authorized user record must have a confirmed email address.
Server generic. Sends email using the email configuration and "from" address for the system or company server. This option requires "Send generic" access to the Server Email resource.
To
The email address(es) to which to send the email. Separate email addresses with semi-colons.
CC
The email addresses to copy on the email. Separate email addresses with semi-colons.
BCC
The email addresses to blind copy on the email. Separate email addresses with semi-colons.
Subject
The subject line.
Text box
The body of the email.
Data extensions
The following data extensions are available for the report:
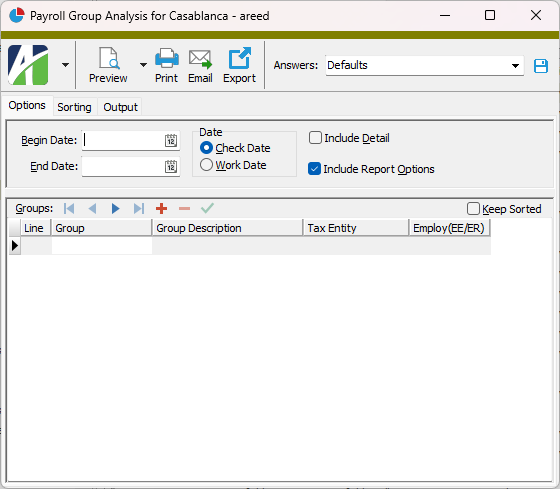
The Payroll Group Analysis report shows payroll details by check line group. You can specify a list of groups and up to five levels of subtotals. You can even subtotal on custom fields defined for employees and checks. This report can produce the numbers you need to fill out Form 940.
Content
When run to show detail, for each check line included on the report, the report shows:
employee code
employee name
check date or work date
batch - entry number - line number
PRCode
garnishment record number (when applicable)
source
rate
result.
The following totals appear on the report:
grand totals.
Print the report
In the Navigation pane, highlight the Payroll/Human Resources > Checks > Check Lines folder.
Start the report set-up wizard.
To report on all or a filtered subset of check lines:
Right-click the Check Lines folder and select Select and Report > Payroll Group Analysis from the shortcut menu.
On the Selection tab, define any filters to apply to the data.
To report on specifically selected check lines:
In the HD view, select the check lines to include on the report. You can use Ctrl and/or Shift selection to select multiple records.
Click and select Payroll Group Analysis from the drop-down menu.
To report on a particular check line from the Check Line window:
In the HD view, locate and double-click the check line to report on. The Check Line window opens with the check line loaded.
Click and select Payroll Group Analysis from the drop-down menu.
Select the Options tab.
In the Begin Date and End Date fields, enter the range of dates for which to include information on the report.
In the Date field, select the type of date to use to select the check lines to include on the report. Your options are:
Check Date
Work Date
Note
The type of date you select here affects only the selection of check lines included on the report. Other information reflected on the report (e.g., employee attributes, position, supervisor, pay rate) is always evaluated as of the work date on the check line.
To see check line detail rather than report totals only, mark the Include Detail checkbox.
To include a section at the end of the report with the report settings used to produce the report, leave the Include Report Options checkbox marked. To produce the report without this information, clear the checkbox.
In the Groups table, enter the check line group(s) to include information for on the report.
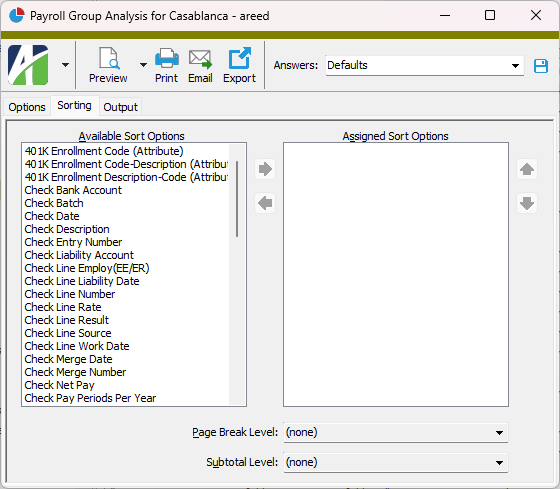
Select the Sorting tab.
In the Available Sort Options list box, highlight the field(s) to sort the report by, then click to move your selection(s) to the Assigned Sort Options list box.
If you selected multiple sort fields, use and to arrange the sort fields in the order you want them applied.
To start a new page for each change in one of the sorting options you specified, select the sorting option to break on from the Page Break Level drop-down list. If you do not want to insert page breaks, accept "(none)".
To subtotal on one of the sorting options you specified, select the sorting option to subtotal on from the Subtotal Through Level drop-down list. If you do not want to show subtotals, accept "(none)".
Select the Output tab.
In the Design field, look up and select the report design to use.
In the toolbar, click the icon for the type of output you want:
- Provides access to two preview options.
Preview - Click the icon or click the drop-down arrow and select Preview from the drop-down menu to view the report in the Crystal Reports viewer.
Preview to PDF - Click the drop-down arrow next to the icon and select Preview to PDF to view the report in the PDF reader.
- Opens the Print dialog so that you can select and configure a printer and then print a paper copy of the report.
- Opens the Report Email dialog so that you can address and compose an email that the report will be attached to. For best results, ensure your email client is running before you attempt to send a report via email.
- Opens a drop-down menu with two export options:
Export Report - Opens a dialog so that you can save the report to a file. File types include Crystal Reports (.rpt), PDF (.pdf), Microsoft Excel (.xls), Microsoft Word (.doc), rich text (.rtf), and XML (.xml).
Export Data - Opens a dialog so that you can export report data to XML or JSON file format.
From
The email account from which to send the email. Valid options are:
Windows user default account. Sends email using the user's Windows default email account. For most users, this is the account configured in Outlook or another email client application.
Server personal. Sends email using the email configuration for the system or company server and the email address on the current user's authorized user record. The authorized user record must have a confirmed email address.
Server generic. Sends email using the email configuration and "from" address for the system or company server. This option requires "Send generic" access to the Server Email resource.
To
The email address(es) to which to send the email. Separate email addresses with semi-colons.
CC
The email addresses to copy on the email. Separate email addresses with semi-colons.
BCC
The email addresses to blind copy on the email. Separate email addresses with semi-colons.
Subject
The subject line.
Text box
The body of the email.
Data extensions
The following data extensions are available for the report:
The Garnishment Analysis report requires Visible access to the Garnishment Records folder.
Purpose
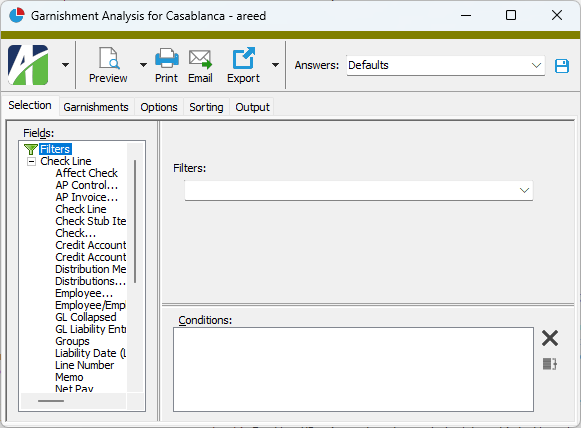
The Garnishment Analysis report shows garnishment check lines and is useful for verifying your employees' garnishment deductions.
Content
When run to show detail, for each check line included on the report, the report shows:
employee code
employee name
batch - entry number - line number
check date
garnishment record number
garnishment type
case number
state
source
rate
result.
The following totals appear on the report:
grand totals.
Print the report
In the Navigation pane, highlight the Payroll/Human Resources > Checks > Check Lines folder.
Start the report set-up wizard.
To report on all or a filtered subset of check lines:
Right-click the Check Lines folder and select Select and Report > Garnishment Analysis from the shortcut menu.
On the Selection tab, define any filters to apply based on check line fields.
To report on specifically selected check lines:
In the HD view, select the check lines to include on the report. You can use Ctrl and/or Shift selection to select multiple records.
Click and select Garnishment Analysis from the drop-down menu.
To report on a particular check line from the Check Line window:
In the HD view, locate and double-click the check line to report on. The Check Line window opens with the check line loaded.
Click and select Garnishment Analysis from the drop-down menu.
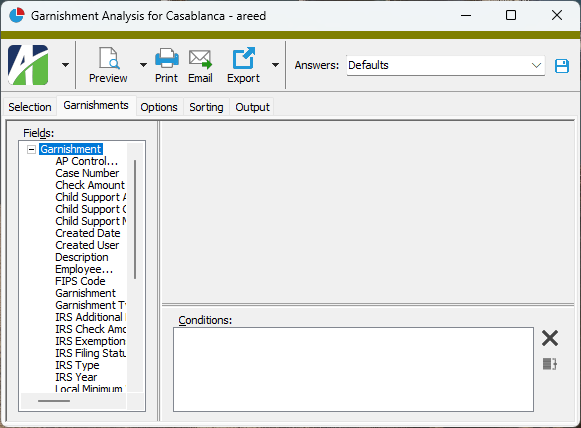
Select the Garnishments tab.
Define any filters to apply based on garnishment fields.
Select the Options tab.
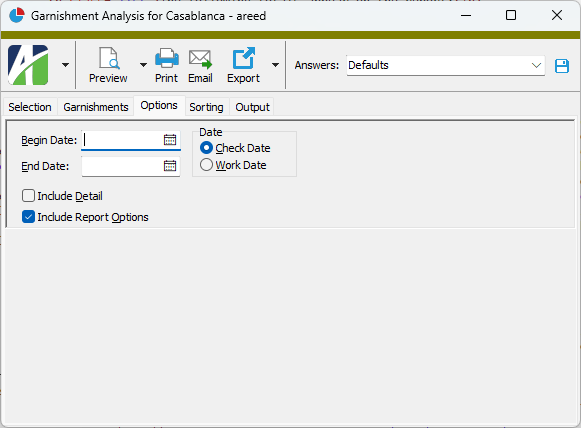
In the Begin Date and End Date fields, enter the range of dates for which to include garnishment information on the report. A blank date indicates no limit by date.
In the Date field, select the type of date to use to select the check lines to include on the report. Your options are:
Check Date
Work Date
Note
The type of date you select here affects only the selection of check lines included on the report. Other information reflected on the report is always evaluated as of the work date on the check line.
To see check line detail rather than report totals only, mark the Include Detail checkbox.
To include a section at the end of the report with the report settings used to produce the report, leave the Include Report Options checkbox marked. To produce the report without this information, clear the checkbox.
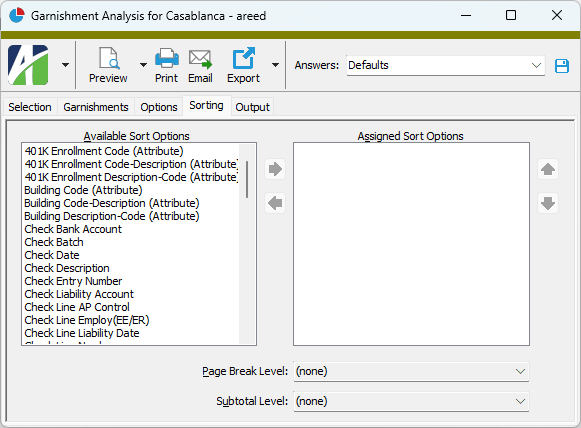
Select the Sorting tab.
In the Available Sort Options list box, highlight the field(s) to sort the report by, then click to move your selection(s) to the Assigned Sort Options list box.
If you selected multiple sort fields, use and to arrange the sort fields in the order you want them applied.
To start a new page for each change in one of the sorting options you specified, select the sorting option to break on from the Page Break Level drop-down list. If you do not want to insert page breaks, accept "(none)".
To subtotal on one of the sorting options you specified, select the sorting option to subtotal on from the Subtotal Level drop-down list. If you do not want to show subtotals, accept "(none)".
Select the Output tab.
In the Design field, look up and select the report design to use.
In the toolbar, click the icon for the type of output you want:
- Provides access to two preview options.
Preview - Click the icon or click the drop-down arrow and select Preview from the drop-down menu to view the report in the Crystal Reports viewer.
Preview to PDF - Click the drop-down arrow next to the icon and select Preview to PDF to view the report in the PDF reader.
- Opens the Print dialog so that you can select and configure a printer and then print a paper copy of the report.
- Opens the Report Email dialog so that you can address and compose an email that the report will be attached to. For best results, ensure your email client is running before you attempt to send a report via email.
- Opens a drop-down menu with two export options:
Export Report - Opens a dialog so that you can save the report to a file. File types include Crystal Reports (.rpt), PDF (.pdf), Microsoft Excel (.xls), Microsoft Word (.doc), rich text (.rtf), and XML (.xml).
Export Data - Opens a dialog so that you can export report data to XML or JSON file format.
From
The email account from which to send the email. Valid options are:
Windows user default account. Sends email using the user's Windows default email account. For most users, this is the account configured in Outlook or another email client application.
Server personal. Sends email using the email configuration for the system or company server and the email address on the current user's authorized user record. The authorized user record must have a confirmed email address.
Server generic. Sends email using the email configuration and "from" address for the system or company server. This option requires "Send generic" access to the Server Email resource.
To
The email address(es) to which to send the email. Separate email addresses with semi-colons.
CC
The email addresses to copy on the email. Separate email addresses with semi-colons.
BCC
The email addresses to blind copy on the email. Separate email addresses with semi-colons.
Subject
The subject line.
Text box
The body of the email.
Data extensions
The following data extensions are available for the report:
The Insurance Analysis report requires Visible access to the Insurance Coverage and Check Lines folders.
Purpose
The Insurance Analysis report lets you review check lines assigned to employee insurance coverage records.
Content
When run to show detail, for each check line included on the report, the report shows:
employee code
employee name
batch - entry number - line number
check date
insurance record number
insurance record description
source
rate
result
insurance type
insurance carrier
insurance plan
coverage option.
The following totals appear on the report:
grand totals.
Print the report
In the Navigation pane, highlight the Payroll/Human Resources > Checks > Check Lines folder.
Start the report set-up wizard.
To report on all or a filtered subset of check lines:
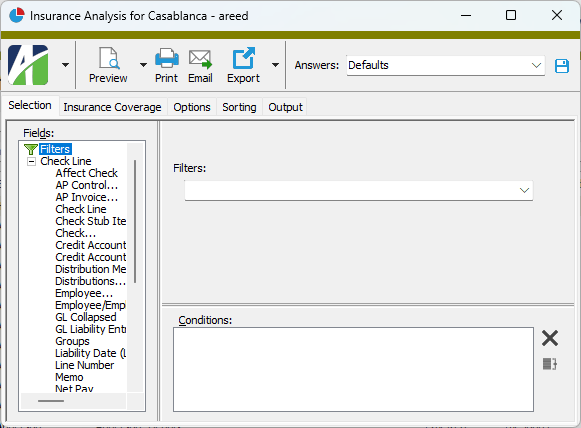
Right-click the Check Lines folder and select Select and Report > Insurance Analysis from the shortcut menu.
On the Selection tab, define any filters to apply based on check line fields.
To report on specifically selected check lines:
In the HD view, select the check lines to include on the report. You can use Ctrl and/or Shift selection to select multiple records.
Click and select Insurance Analysis from the drop-down menu.
To report on a particular check line from the Check Line window:
In the HD view, locate and double-click the check line to report on. The Check Line window opens with the check line loaded.
Click and select Insurance Analysis from the drop-down menu.
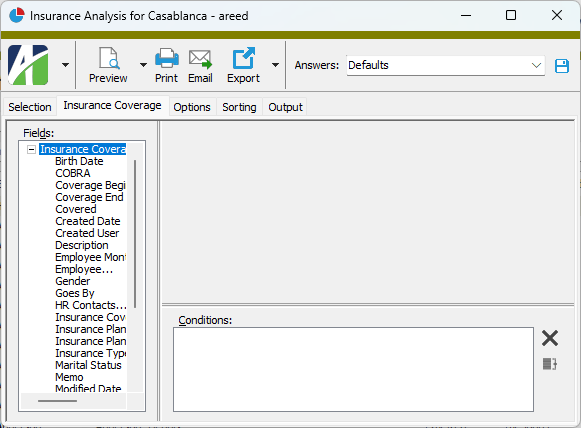
Select the Insurance tab.
Define any filters to apply based on insurance fields.
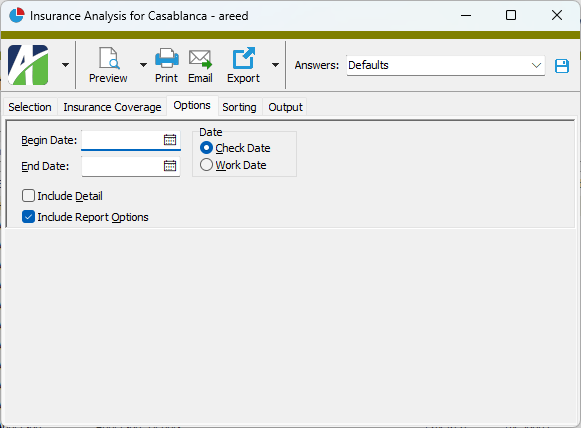
Select the Options tab.
In the Begin Date and End Date fields, enter the range of dates for which to include insurance check line information on the report. A blank date indicates no limit by date.
In the Date field, select the type of date to use to select the check lines to include on the report. Your options are:
Check Date
Work Date
Note
The type of date you select here affects only the selection of check lines included on the report. Other information reflected on the report is always evaluated as of the work date on the check line.
To see check line detail rather than report totals only, mark the Include Detail checkbox.
To include a section at the end of the report with the report settings used to produce the report, leave the Include Report Options checkbox marked. To produce the report without this information, clear the checkbox.
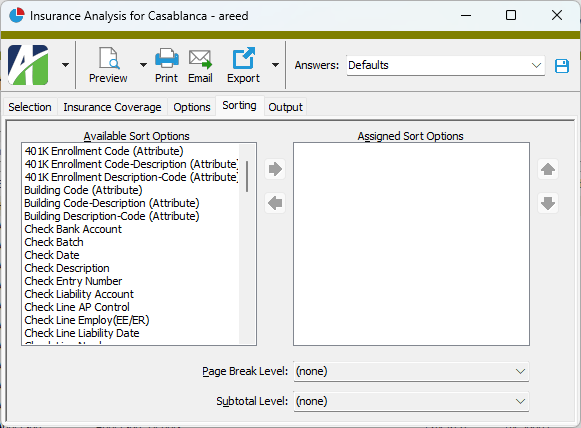
Select the Sorting tab.
In the Available Sort Options list box, highlight the field(s) to sort the report by, then click to move your selection(s) to the Assigned Sort Options list box.
If you selected multiple sort fields, use and to arrange the sort fields in the order you want them applied.
To start a new page for each change in one of the sorting options you specified, select the sorting option to break on from the Page Break Level drop-down list. If you do not want to insert page breaks, accept "(none)".
To subtotal on one of the sorting options you specified, select the sorting option to subtotal on from the Subtotal Level drop-down list. If you do not want to show subtotals, accept "(none)".
Select the Output tab.
In the Design field, look up and select the report design to use.
In the toolbar, click the icon for the type of output you want:
- Provides access to two preview options.
Preview - Click the icon or click the drop-down arrow and select Preview from the drop-down menu to view the report in the Crystal Reports viewer.
Preview to PDF - Click the drop-down arrow next to the icon and select Preview to PDF to view the report in the PDF reader.
- Opens the Print dialog so that you can select and configure a printer and then print a paper copy of the report.
- Opens the Report Email dialog so that you can address and compose an email that the report will be attached to. For best results, ensure your email client is running before you attempt to send a report via email.
- Opens a drop-down menu with two export options:
Export Report - Opens a dialog so that you can save the report to a file. File types include Crystal Reports (.rpt), PDF (.pdf), Microsoft Excel (.xls), Microsoft Word (.doc), rich text (.rtf), and XML (.xml).
Export Data - Opens a dialog so that you can export report data to XML or JSON file format.
From
The email account from which to send the email. Valid options are:
Windows user default account. Sends email using the user's Windows default email account. For most users, this is the account configured in Outlook or another email client application.
Server personal. Sends email using the email configuration for the system or company server and the email address on the current user's authorized user record. The authorized user record must have a confirmed email address.
Server generic. Sends email using the email configuration and "from" address for the system or company server. This option requires "Send generic" access to the Server Email resource.
To
The email address(es) to which to send the email. Separate email addresses with semi-colons.
CC
The email addresses to copy on the email. Separate email addresses with semi-colons.
BCC
The email addresses to blind copy on the email. Separate email addresses with semi-colons.
Subject
The subject line.
Text box
The body of the email.
Data extensions
The following data extensions are available for the report:
Employees
Checks
Check lines
Check Line Record ID
Check
Displays the batch name and entry number of the check that this check line belongs to.
Press F3 to look up the value.
If a value is already selected, you can press F4 to open the record in its native editor.
Line
Displays the check line number.
Check Date
Displays the check date for the check associated with the check line.
Employee
Displays the employee code for the employee associated with the check line.
Press F3 to look up the value.
If a value is already selected, you can press F4 to open the record in its native editor.
Net Pay
Displays the net pay amount for the check.
Check Line tab
Work Date
Displays the work date on the check line. The work date is a date in the pay period of the check run, typically the last day of the pay period. This could be a different date in the pay period, for example, if the employee's pay rate changed during the pay period.
Depending on how the PRCode for the check line is set up, the Source, Rate, and Result fields may default their values from calculation expressions and parameter values on the PRCode and on the employee. If the check has not been merged, one or more of these fields may be enabled. If you need to edit one of these fields and it is not enabled, you can unlock the field by selecting it and then selecting > Tools > Unlock Source/Rate/Result or pressing Ctrl+Alt+U.
Source
The source amount used to calculate the check line result. The source amount comes from the source expression on the PRCode.
Example
For a check line that represents pay, the source amount could be hours worked.
Rate
The rate used to calculate the check line result. The rate comes from the rate expression on the PRCode.
Result
The result of the check line calculation. The result comes from the result expression on the PRCode.
Distribution Method
The distribution method for the check line. Valid methods are:
By Source. The account number is determined by the PRCode, the employee, or both.
Follows Pay. Distributions are automatically generated for the selected PRCodes. The distributions are proportional to the distributions for a selected group of other check lines. "Follows Pay" is defined on the PRCode segment item.
Manual. Account numbers are entered manually.
Split Period. The distribution splits the check between two GL periods.
This field is disabled if the check line comes from a voided or reversal check.
PRCode
The PRCode that defines how to calculate this check line.
Press F3 to look up the value.
If a value is already selected, you can press F4 to open the record in its native editor.
Garnishment
If the check line represents a garnishment, this field shows the garnishment record associated with the check line.
Press F3 to look up the value.
If a value is already selected, you can press F4 to open the record in its native editor.
AP Control
This field is visible if the Payroll to AP interface is enabled. This field shows the AP control used for posting Payroll amounts on this check line to Accounts Payable.
Press F3 to look up the value.
If a value is already selected, you can press F4 to open the record in its native editor.
AP Invoice
This field is visible if the Payroll to AP interface is enabled. This field shows the invoice created for this check line. You can drill down to the invoice from this field if you need to investigate payroll vendor payments.
Press F3 to look up the value.
If a value is already selected, you can press F4 to open the record in its native editor.
Liability Date
For deduction and tax items, the GL posting date of the liability entry. The default liability date type (check date, work date) can be set at the segment item level.
Note
If you override the date in this field, but the liability date source is "Check Date" or "Work Date" and the check date or work date, respectively, changes, the date is replaced by the new check date or work date.
Credit Account
The liability credit account associated with the check line. The default account is derived by combining masks on the PRCode and employee attributes.
Memo
Enter additional information about the check line as needed. If the check line was created as a result of processing time sheets, the default memo was copied from the memo on the corresponding time sheet line.
Press F2 to open the Account Expand dialog box where you can look up an account number, find an account number by its alias, build the account number by segment, or view setup and setup sources.
Press F3 to look up the account.
If an account is already selected, you can press F4 to open the record in the Account window.
 Maintain a check line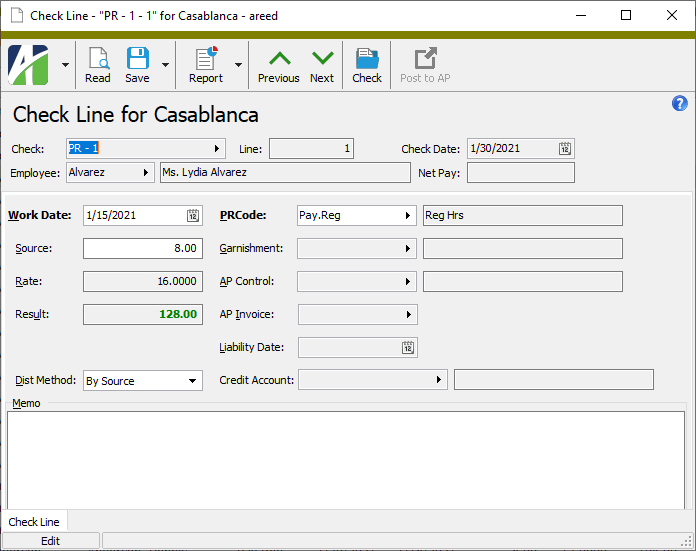
 > Tools > Unlock Source/Rate/Result or press Ctrl+Alt+U to unlock the field for data entry.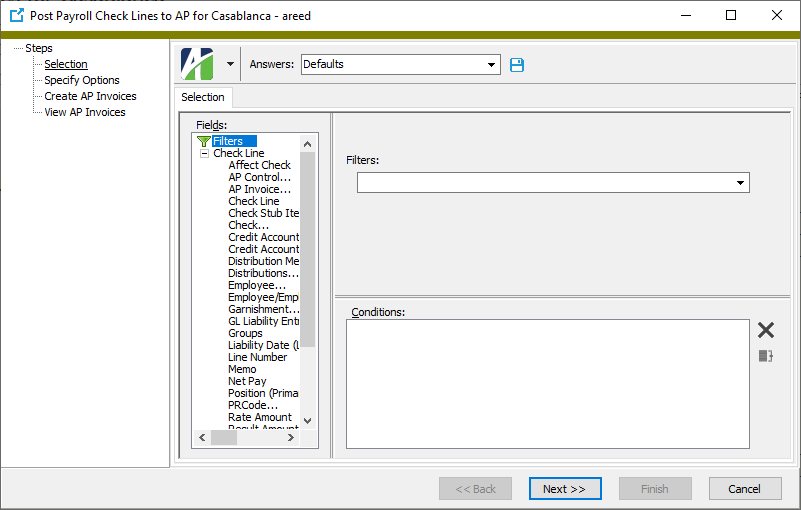
 .
.
 and select Check Lines Listing from the drop-down menu.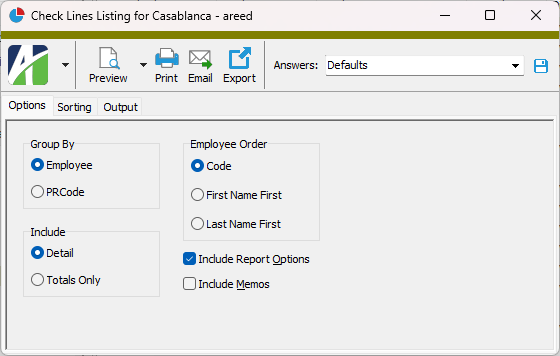
 to move your selection(s) to the Assigned Sort Options list box.
 and
and  to arrange the sort fields in the order you want them applied.
 - Provides access to two preview options.
 - Opens the Print dialog so that you can select and configure a printer and then print a paper copy of the report.
 - Opens the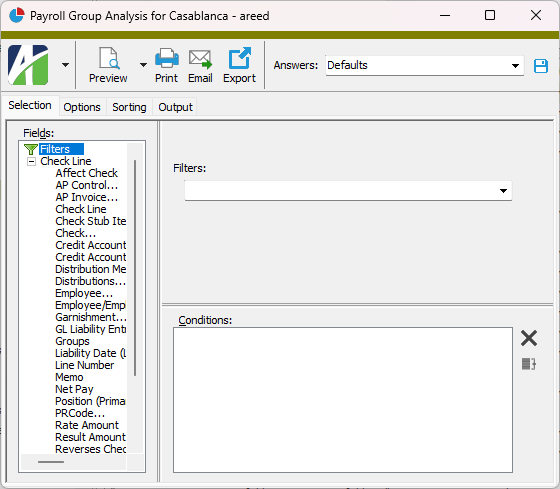
 > Tools > Unlock Source/Rate/Result or pressing Ctrl+Alt+U.
