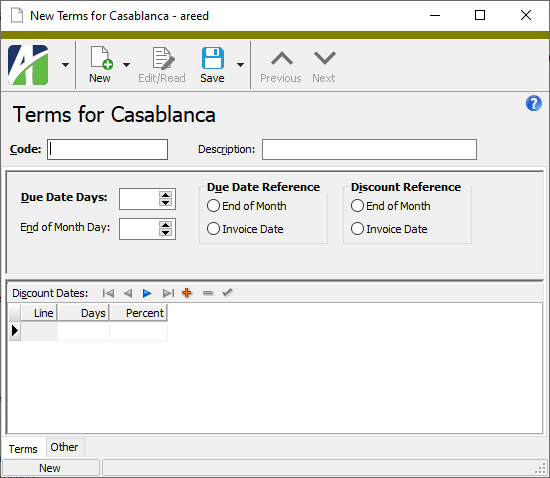
Terms Record ID
Code
A unique code for the payment terms.
Description
A description of the payment terms.
Terms tab
Due Date Days
The number of days from the due date reference date (end of month or invoice date) until payment is due.
End of Month Day
By default, ActivityHD uses the last day of the calendar month as the basis for calculating the due date and discount dates for the "End of Month" method. You can, however, base your end-of-month payment terms on a different cutoff date. This is called proximo or prox dating. If you use prox dating, enter the day of the month to base the end of month on for these payment terms. Leave this field blank if you want to use the actual last day of the month.
Note
If the day you specify here is greater than the last day of the month, the actual last day of the month is used. For example, if you enter "30", the 30th of the month is used for the due date calculation for all months except February. For February, "28" or "29" is used, depending on whether it's a leap year. Entering "31" here is equivalent to leaving the field blank.
Due Date Reference
The reference date to base the due date determination on. Your options are:
End of Month. If the invoice date falls before the day specified in the End of Month Day field, the current month's end-of-month day is used as the starting point for calculating the due date. If the invoice date falls after the end-of-month day, next month's end-of-month day is used as the starting point. In either case, the value in the Due Date Days field is added to the end-of-month day to determine the invoice due date.
Examples
If the end-of-month day is "25" and the invoice date is 07/20, then 07/25 is the starting point.
If the end-of-month day is "25" and the invoice date is 07/27, then 08/25 is the starting point.
- Invoice Date. The due date is determined by adding the value in the Due Date Days field to the invoice date.
Discount Reference
The reference date to base the discount date determination on. Your options are:
End of Month. If the invoice date falls before the day specified in the End of Month Day field, the current month's end-of-month day is used as the starting point for calculating the discount date(s). If the invoice date falls after the end-of-month day, next month's end-of-month day is used as the starting point. In either case, the value(s) in the Discount Date Days column in the Discount Dates table is added to the end-of-month day to determine the discount date(s).
Examples
If the end-of-month day is "25" and the invoice date is 07/20, then 07/25 is the starting point.
If the end-of-month day is "25" and the invoice date is 07/27, then 08/25 is the starting point.
- Invoice Date. The discount date(s) is determined by adding the value(s) in the Discount Due Days column in the Discount Dates table to the invoice date.
Discount Dates table
Use this table to enter the discount terms associated with the payment terms. If there are no discount terms, leave the table blank. Enter as many discount lines as you need. Percentages should decrease from top to bottom.
Days
The number of days from the discount reference date in which payment must be made in order to claim the corresponding discount.
Percent
The discount percentage available if payment is made by the corresponding discount date. The actual amount of the discount is determined by multiplying the discount percent times the discount basis.
The following formula is used to calculate the discount amount:
Discount = Payment Terms Basis * (Percent / 100)
Custom tab
This tab is visible if custom fields exist for the entity. At a minimum, if there are custom fields, a Fields subtab will be present. One or more additional categories of subtabs may also be visible.
Fields subtab
This tab prompts for values for any custom fields set up for entity records of this entity type. Respond to the prompts as appropriate.
References subtab
This tab is visible if other records reference the current record.
Reference
From the drop-down list, select the custom field to view references for. Reference custom fields have the following format: PackageName.EntityName.CustomFieldName.
Example
Suppose a custom field exists on PRCodes that references an ARCode. On the ARCode record, on the Custom > References subtab, you can view all the PRCodes which reference that ARCode.
Exchange Folder subtab
This tab is visible only if you set up a custom field with a data type of "Exchange Folder". The label on this tab is the name assigned to the custom field.
This tab shows the contents of the specified Exchange folder.
File subtab
This tab is visible only if you set up a custom field with a data type of "File". The label on the tab is the name assigned to the custom field.
This tab renders the contents of the specified file according to its file type.
Internet Address subtab
This tab is visible only if you set up a custom field with a data type of "Internet Address". The label on this tab is the name assigned to the custom field.
This tab shows the contents of the specified web page.
Network Folder subtab
This tab is visible only if you set up a custom field with a data type of "Network Folder". The label on this tab is the name assigned to the custom field.
This tab shows the contents of the specified network folder.
Customers tab
The AR Customers pane shows the AR Customers HD view filtered to show all customers the selected payment terms are assigned to.
Double-click a row in the pane to drill down to its record in the AR Customer window.
The Attachments tab is visible if any record for a given entity has an attachment. If the Attachments tab is not visible, this implies that no record of the entity type has an attachment on it; however, once an attachment is added to any record of the entity type, the Attachments tab will become available.
Attachments
The list box shows the files which are attached to the current record. Highlight a file name to preview the file in the adjacent pane. Double-click a file name to open the file in its native editor.
Preview pane
If a file name is highlighted in the Attachments list box, this pane shows a preview of the file contents. Some file types cannot be previewed but can be double-clicked to open in their native editor.
Change Logs tab
This tab is visible if the user has "Change Logs" access to the associated data folder resource.
The Change Logs pane shows the Change Logs HD view filtered to show all change logs for the selected entity record.
Double-click a row in the pane to drill down to its record in the Change Log window.
Other tab
Memo tab
To include additional information about this record not collected elsewhere, enter it in this text box. This area supports common keyboard shortcuts such as Ctrl+C to copy and Ctrl+V to paste.
Timestamps tab
This tab shows the user who created this record and the date and time of creation as well as the user, date, and time of the latest modification to the record.
Developer tab
This tab is visible only when developer features are enabled.
Automation subtab
This subtab shows field names and values for the current data record. Use the information in the subtab to assist when creating automation objects such as bots and import files. The field names and field values can be copied from the text box and pasted directly into your code or application. To copy content from the text box, highlight the content to copy and press Ctrl+C or right-click your selection and select Copy from the context menu.
Export (XML | JSON) subtab
This subtab shows the XML syntax for exporting the selected data record. The syntax can be copied from the text box as an exemplar for creating your own automation objects for bots, import files, ActivWebAPI, etc. To copy content from the text box, highlight the content to copy and press Ctrl+C or right-click your selection and select Copy from the context menu.
Import (XML | JSON) subtab
This subtab allows you to select a file for import and shows the XML syntax for importing data records. Use the subtab to explore the XML syntax for importing data records. In particular, you can investigate the syntax which results when using Data.Import and ActivWebAPI data POST and DELETE routes.
Change Log (XML | JSON) subtab
This subtab is visible only when the Enable Change Logs option is marked in System Options or Company Options (depending on whether the feature applies at the system or the company level). This is the default setting when developer features are enabled.
This subtab allows you to investigate changes to the current data record. The syntax can be copied for use in bots, dashboards, ActivWebAPI, and other automation. To copy content from the text box, highlight the content to copy and press Ctrl+C or right-click your selection and select Copy from the context menu.
Select Statement (SQL) subtab
This subtab allows you to investigate the SQL select statement used to retrieve the current data record. The syntax can be copied as an exemplar for data sources and other automation. To copy content from the text box, highlight the content to copy and press Ctrl+C or right-click your selection and select Copy from the context menu.
 . The New Terms window opens.