Calendars define an organization's fiscal year and period structure. Calendar creation is the first step in setting up your general ledger and is typically handled when ActivityHD is installed.
In ActivityHD, the calendar serves three purposes:
To organize the general ledger postings.
To control which date(s) can be entered on postings.
To provide date-based groups of postings for reporting.
ActivityHD includes the following preinstalled calendars: Annual, Quarterly, Monthly, Weekly, and Forever. The "Forever" calendar contains one period which spans all possible dates in ActivityHD—from 1/1/1900 to 12/31/2999. The preinstalled calendars can be added to, modified, or deleted as needed.
You will need a fiscal calendar that corresponds to your regular reporting periods. Beyond that, you can create more calendars for custom reporting. If your fiscal calendar uses monthly periods, you may want to also create calendars for daily, weekly, and quarterly reporting. Multiple calendars can be used to define alternate date ranges for the same company or to consolidate financials in a multi-company environment where the different companies have different fiscal years. You might even have a semi-monthly calendar for payroll and a separate calendar for general ledger.
You can define as many accounting years for a calendar as you need. You must define accounting periods for each year that has general ledger data.
Closing accounting periods occurs at the calendar level. Calendars give you control over which periods are open and which are closed, thus facilitating secure postings. After an accounting period is closed, you cannot post to the period unless overrides are allowed or the period is subsequently reopened.
One calendar must be designated as the default calendar. The default calendar determines which accounting periods are open for the accounts that are assigned to the calendar. It is common to name the default calendar "Month" (to indicate monthly accounting periods) or "Fiscal" (to indicate the fiscal year/periods used).
In the Navigation pane, highlight the General Ledger > Setup > Calendars folder.
Click . The New Calendar window opens.
Enter a unique Code for the calendar.
Enter a Description of the calendar.
If you want ActivityHD to default to this calendar whenever a calendar is prompted for, mark the Default checkbox. Only one calendar can be designated as the default calendar. This calendar is also used if no segment in the chart of accounts requires a calendar.
From the Post Control drop-down list, select how ActivityHD handles postings to a closed period. Your options are:
Error. ActivityHD returns an error and will only accept entries in open periods.
Warning. ActivityHD returns a warning but will accept entries that are not in open periods.
Note
If you specify a package-specific post control in the Periods table, it will override this post control setting.
In the Open Before field, enter the number of periods before the current period (based on today's date) to consider open and available for posting.
In the Open After field, enter the number of periods after the current period (based on today's date) to consider open and available for posting.
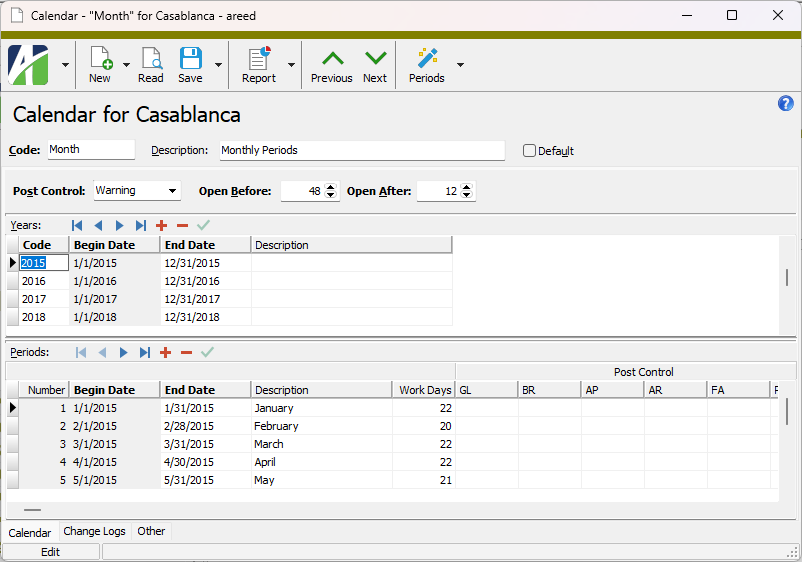
In the Years table, enter the years that the calendar is valid. To do so, do the following for each valid year:
In the Code column, enter a year code. Typically, this would be the four-digit year. This code is used in date expressions and financial expressions to refer to a specific year of a calendar.
In the Begin Date column, enter the date of the first day of the fiscal year. The date must be valid and less than the End Date for the same year.
In the End Date column, enter the date of the last day of the fiscal year. The date must be valid and greater than the Begin Date for the same year.
In the Description column, enter a description of the year.
In the Periods table, enter the periods of the selected years that are valid. You can use the Automatic Periods wizard to create the periods or enter the periods directly in the table. Do one of the following for each year you need to create periods for:
To use the Automatic Periods wizard:
Select a fiscal year in the Years table.
Click .
From the drop-down menu, select the type of accounting periods to create. Your options are:
Monthly
Semimonthly
Quarterly
Weekly
Biweekly
Daily
Four Weeks
Four/Four/Five
Five/Four/Four
Four/Five/Four
The wizard loads the periods into the Periods table.
Modify the settings in the Periods table if needed.
To enter the periods directly in the table:
Select a fiscal year in the Years table.
Note
The Begin Date, End Date, and Work Days for the first row are loaded for you. On subsequent rows, the Begin Date loads and you are immediately prompted for the End Date.
In the End Date column, enter the date of the last day of the period.
Enter a Description of the period.
The Work Days column is calculated for you. If you need to override the number, type the actual number of work days in the period. Valid values are from 0 to the number of work days in the period.
In the Post Control columns, select how to handle posting to the accounting period. Your options are:
<blank>. Use the post control designated for the calendar.
Open. The period is open for posting.
Error. The period is closed to posting. Attempts to make entries to the period are rejected and ActivityHD issues an error message.
Warning. The period is closed to posting. Attempts to make entries to the period are allowed, but ActivityHD issues a warning message.
Repeat steps b-e for each period in the fiscal year.
Note
A posting control can be specified in up to three places on the calendar: (1) on the package, (2) on the GL package, (3) on the calendar as a whole. The posting control actually used is the first posting control encountered when evaluated in the order described.
Generally, you close an individual accounting period through its GL calendar. Once an accounting period is closed, postings cannot be made to the period unless overrides are allowed or if the period is reopened. ActivityHD allows you to specify a "control calendar" (the default calendar) which determines the open accounting periods for the accounts assigned to the calendar. It is typical to name the control calendar "Month" (for monthly accounting periods) or "Fiscal" (for fiscal year/periods).
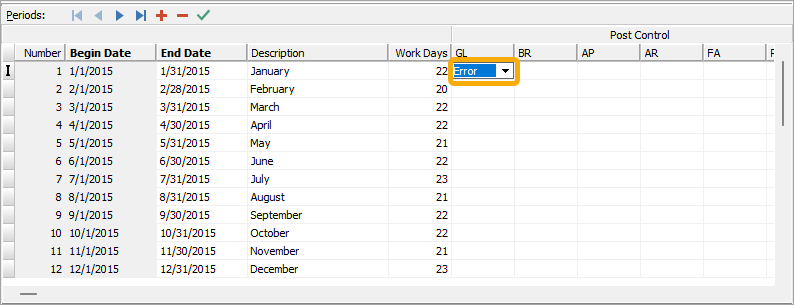
Briefly, to close an accounting period, you change its posting controls to "Error".
In the Navigation pane, highlight the General Ledger > Setup > Calendars folder.
In the HD view, locate the control calendar and double-click its record to open it in the Calendar window.
In the Years table, select the row that represents the year of the accounting period you want to close.
In the Periods table, locate the accounting period to close.
In the Post Control section, for each package you want to close the accounting period for (in particular GL), select the appropriate closing option. Your options are:
Error. The period is closed to posting. Attempts to make entries to the period are rejected and ActivityHD issues an error message.
Warning. The period is closed to posting. Attempts to make entries to the period are allowed, but ActivityHD issues a warning message.
A calendar cannot be deleted if it has any references.
To delete a calendar that is not in use, highlight the calendar in the HD view and click , or open the calendar and select > Edit > Delete. In either case, ActivityHD prompts you to confirm your action. Click Delete to delete the calendar.
Calendars Listing
Calendars Listing
Purpose
The Calendars Listing provides a list of GL calendars defined in the General Ledger.
Content
For each calendar included on the report, the listing shows:
description
posting control
number of periods before
number of periods after
whether it is the default calendar.
In addition, you can include one or more of the following:
year information (year, date range, description)
period information (period number, date range, description, work days, posting control)
timestamps
memos
custom fields.
The following total appears on the report:
record count.
Print the report
In the Navigation pane, highlight the General Ledger > Setup > Calendars folder.
Start the report set-up wizard.
To report on all or a filtered subset of calendars:
Right-click the Calendars folder and select Select and Report > Calendars Listing from the shortcut menu.
On the Selection tab, define any filters to apply to the data.
To report on specifically selected calendars:
In the HD view, select the calendars to include on the report. You can use Ctrl and/or Shift selection to select multiple records.
Click .
To report on a particular calendar from the Calendar window:
In the HD view, locate and double-click the calendar to report on. The Calendar window opens with the calendar loaded.
Click .
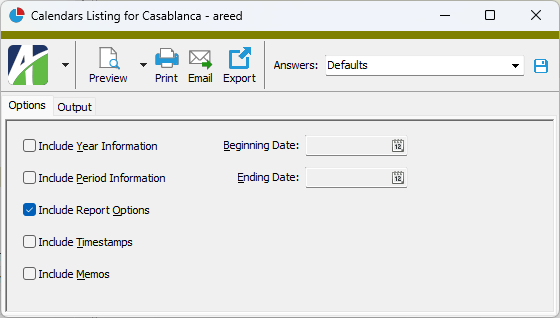
Select the Options tab.
Mark the checkbox(es) for the additional information to include:
Year Information. If you mark this checkbox, the Beginning Date and Ending Date fields are enabled. Enter the range of dates to report on.
Period Information. If you mark this checkbox, the Beginning Date and Ending Date fields are enabled. Enter the range of dates to report on.
Report Options. To include a section at the end of the report with the report settings used to produce the report, leave the checkbox marked. To produce the report without this information, clear the checkbox.
Timestamps
Memos
Custom Fields (only visible if custom fields are set up)
Select the Output tab.
In the Design field, look up and select the report design to use.
In the toolbar, click the icon for the type of output you want:
- Provides access to two preview options.
Preview - Click the icon or click the drop-down arrow and select Preview from the drop-down menu to view the report in the Crystal Reports viewer.
Preview to PDF - Click the drop-down arrow next to the icon and select Preview to PDF to view the report in the PDF reader.
- Opens the Print dialog so that you can select and configure a printer and then print a paper copy of the report.
- Opens the Report Email dialog so that you can address and compose an email that the report will be attached to. For best results, ensure your email client is running before you attempt to send a report via email.
- Opens a drop-down menu with two export options:
Export Report - Opens a dialog so that you can save the report to a file. File types include Crystal Reports (.rpt), PDF (.pdf), Microsoft Excel (.xls), Microsoft Word (.doc), rich text (.rtf), and XML (.xml).
Export Data - Opens a dialog so that you can export report data to XML or JSON file format.
From
The email account from which to send the email. Valid options are:
Windows user default account. Sends email using the user's Windows default email account. For most users, this is the account configured in Outlook or another email client application.
Server personal. Sends email using the email configuration for the system or company server and the email address on the current user's authorized user record. The authorized user record must have a confirmed email address.
Server generic. Sends email using the email configuration and "from" address for the system or company server. This option requires "Send generic" access to the Server Email resource.
To
The email address(es) to which to send the email. Separate email addresses with semi-colons.
CC
The email addresses to copy on the email. Separate email addresses with semi-colons.
BCC
The email addresses to blind copy on the email. Separate email addresses with semi-colons.
Subject
The subject line.
Text box
The body of the email.
Data extensions
The following data extension is available for the report:
Calendars
Calendar Record ID
Code
A unique code for the calendar.
Description
A description of the calendar.
Default
Mark this checkbox if you want ActivityHD to default to this calendar whenever a GL calendar is prompted for. Only one calendar can be designated as the default calendar. This calendar is also used if no segment in the chart of accounts requires a calendar.
Calendar tab
Post Control
From the drop-down list, select how ActivityHD should handle postings to a closed period. Your options are:
Error. ActivityHD returns an error and will only accept entries in open periods.
Warning. ActivityHD returns a warning but will accept entries that are not in open periods.
Note
Package-specific post controls take precedence over this post control setting.
Open Before
The number of periods before the current period (based on today's date) to consider open and available for posting without warning or error.
Open After
The number of periods after the current period (based on today's date) to consider open and available for posting without warning or error.
Years table
Use this table to define the years that the calendar is valid.
Code
The year code. Typically, this is the four-digit year. This code is used in date expressions and financial expressions to refer to a specific year of the calendar.
Begin Date
The date of the first day of the fiscal year. The date must be valid and less than the end date for the same year.
End Date
The date of the last day of the fiscal year. The date must be valid and greater than the begin date for the same year.
Description
A description of the year.
Periods table
Use this table to define the periods that are valid for a selected fiscal year. You can enter periods directly in the table or you can use the Automatic Periods wizard to populate the table.
To use the wizard, select the fiscal year to create periods for in the Years table, click , and select the type of accounting periods to create from the drop-down menu. Your options are:
Monthly
Semimonthly
Quarterly
Weekly
Biweekly
Daily
Four Weeks
Four/Four/Five
Five/Four/Four
Four/Five/Four
After you make your selection, the wizard loads the periods in the table. You can modify the entries in the Periods table as needed.
Number
The system-assigned period number.
Begin Date
The date of the first day of the period. Begin dates are system-generated and cannot be edited. For the first period, the begin date is the begin date of the fiscal year. For subsequent periods, the begin date is based on the end date of the preceding period.
End Date
The date of the last day of the period. The end date of a period determines the begin date of the next period.
Description
A description of the period. If the Automatic Periods wizard was used to create periods, the default description is based on the type of accounting periods selected.
Work Days
The actual number of work days in the period. Take into account your company holidays and your work day structure. The default number is based on a 5-day work week without consideration for holidays (and excluding Saturdays and Sundays). Valid values are from 0 to the number of work days in the period.
Post Control
A column appears in this section for each ActivityHD package which posts to the General Ledger that is installed for the company (potentially GL, AP, AR, FA, and PR). Use the posting controls to manage which packages you can post to the General Ledger from during a given period.
For each ActivityHD package for each period defined, select the posting control that applies. Your options are:
<blank>. No posting control is designated at the package level. The posting control on the calendar determines how posting from the package is handled for the corresponding period.
Open. The corresponding period is open for posting from the package.
Error. The corresponding period is closed to posting from the package. Attempts to make entries for the period are rejected and ActivityHD returns an error.
Warning. Entries for the corresponding period are allowed, but ActivityHD returns a warning.
Custom tab
This tab is visible if custom fields exist for the entity. At a minimum, if there are custom fields, a Fields subtab will be present. One or more additional categories of subtabs may also be visible.
Fields subtab
This tab prompts for values for any custom fields set up for entity records of this entity type. Respond to the prompts as appropriate.
References subtab
This tab is visible if other records reference the current record.
Reference
From the drop-down list, select the custom field to view references for. Reference custom fields have the following format: PackageName.EntityName.CustomFieldName.
Example
Suppose a custom field exists on PRCodes that references an ARCode. On the ARCode record, on the Custom > References subtab, you can view all the PRCodes which reference that ARCode.
Exchange Folder subtab
This tab is visible only if you set up a custom field with a data type of "Exchange Folder". The label on this tab is the name assigned to the custom field.
This tab shows the contents of the specified Exchange folder.
File subtab
This tab is visible only if you set up a custom field with a data type of "File". The label on the tab is the name assigned to the custom field.
This tab renders the contents of the specified file according to its file type.
Internet Address subtab
This tab is visible only if you set up a custom field with a data type of "Internet Address". The label on this tab is the name assigned to the custom field.
This tab shows the contents of the specified web page.
Network Folder subtab
This tab is visible only if you set up a custom field with a data type of "Network Folder". The label on this tab is the name assigned to the custom field.
This tab shows the contents of the specified network folder.
The Attachments tab is visible if any record for a given entity has an attachment. If the Attachments tab is not visible, this implies that no record of the entity type has an attachment on it; however, once an attachment is added to any record of the entity type, the Attachments tab will become available.
Attachments
The list box shows the files which are attached to the current record. Highlight a file name to preview the file in the adjacent pane. Double-click a file name to open the file in its native editor.
Preview pane
If a file name is highlighted in the Attachments list box, this pane shows a preview of the file contents. Some file types cannot be previewed but can be double-clicked to open in their native editor.
Other tab
Memo tab
To include additional information about this record not collected elsewhere, enter it in this text box. This area supports common keyboard shortcuts such as Ctrl+C to copy and Ctrl+V to paste.
Timestamps tab
This tab shows the user who created this record and the date and time of creation as well as the user, date, and time of the latest modification to the record.
Extras\General Ledger\Import GL Calendars.xls; Import or Change Calendars.xls
Calendars security
Common accesses available on calendars
Access
A user with this access can...
Change
Use the mass change action on calendars.
Change Logs
Custom Fields
Create and edit custom fields for calendars.
Data
Have read-only access to calendars from anywhere in the software (e.g., field validations, filters, date expressions).
Delete
Delete calendars.
Edit
Edit calendar records.
Export
Export calendar records from ActivityHD.
Import
Import calendar records into ActivityHD.
New
Create new calendar records.
Read
Have read-only access to calendar records.
Report
Run reports with calendar information.
Report Designs
Create and edit report designs with calendar information. This access enables the Report Designs button on the Output tab of report dialogs.
Shared Answers
Create and edit saved answers related to calendars.
Shared Filters
Create and edit shared filters on calendars.
Visible
View the Calendars folder in the Navigation pane.
Automatic Periods wizard
Accounting systems typically operate on a 12-month period called a fiscal year. The fiscal year is typically the basis for organizing postings for financials and controlling the dates which can be entered on postings. A fiscal year does not always correspond to a calendar year, but it represents the time for which a company budgets and records its spending and revenue. A fiscal year is necessary for normal reporting periods. When a company files its tax return, it must declare its accounting periods.
The Automatic Periods wizard generates standardized accounting periods for a selected fiscal year. ActivityHD also supports additional calendars for custom reporting. For instance, while fiscal years commonly use monthly periods, you may want to create calendars for reporting by days, weeks, or quarters. The wizard can generate periods for these additional calendars too.
After you generate periods using the wizard, you can modify them manually if needed.
The table below lists the types of accounting periods that the Automatic Periods wizard can generate, a description of each type, and the default label which ActivityHD uses for each type of period.
Note
If the Automatic Periods wizard is run for a year which already has periods defined, the existing periods will be replaced.
Period Type
Description
Default Label
Monthly
Monthly intervals.
If the beginning date of the year is the first day of a month, each period is defined as a calendar month. If the ending date of the year is not the last day of a month, the final period of the year is a partial month.
If the beginning date of the year is not the first day of a month, each period will begin on the same day of the month.
Name of the month in which the beginning date falls
Semimonthly
Half-month intervals where there are 15 days in the first half and the remaining days in the month make up the second half.
If the beginning date for the year is the first day of a month, each period will start on the 1st or the 16th day of month. If the ending date of the year is not the last day of a month, the final period of the year is a partial month.
If the beginning date of the year is not the first day of a month, each odd-numbered period will begin on the same day within the month and will contain 15 days. Each even-numbered period will contain the remaining days in the "month".
Period ending mm/dd/yyyy
Quarterly
Three-month intervals.
If the beginning date for the year is the first day of a month, quarters will start on the first day of the first, fourth, seventh, and tenth months. If the ending date of the year is not the last day of a month, the final quarter in the year is a partial quarter.
If the beginning date of the year is not the first day of a month, quarters will begin on the same day of the first, fourth, seventh, and tenth months.
Quarter #
Weekly
Weekly intervals (7 days per period)
Week ending mm/dd/yyyy
Biweekly
Two-week intervals (14 days per period)
Period ending mm/dd/yyyy
Daily
Daily intervals
Actual date
Four Weeks
Four-week intervals (28 days per period)
Period ending mm/dd/yyyy
Four/Four/Five
Successive intervals of four, four, and five weeks
Name of the month in which the period principally falls. Periods beyond 12 are numbered (Period 13, etc.).
Five/Four/Four
Successive intervals of five, four, and four weeks
Name of the month in which the period principally falls. Periods beyond 12 are numbered (Period 13, etc.).
Four/Five/Four
Successive intervals of four, five, and four weeks
Name of the month in which the period principally falls. Periods beyond 12 are numbered (Period 13, etc.).
 Create a GL calendar
 . The New Calendar window opens.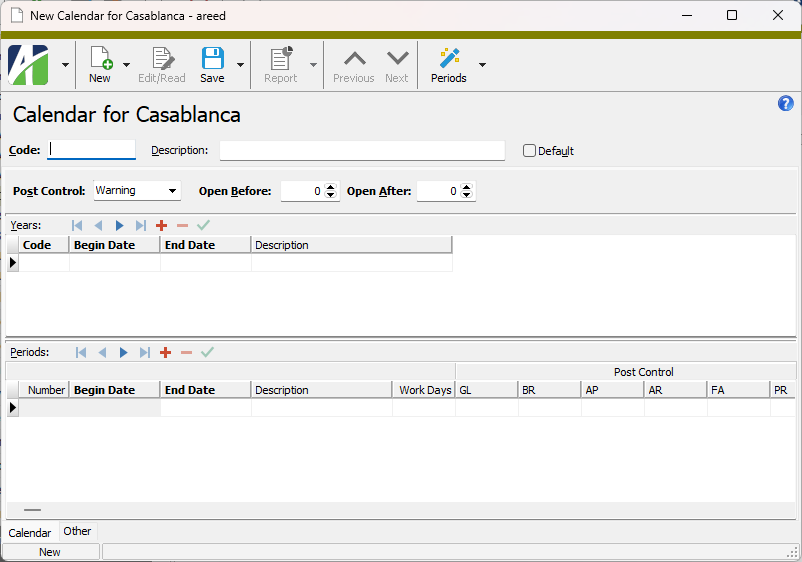
 .
.
 , or open the calendar and select
  > Edit > Delete. In either case,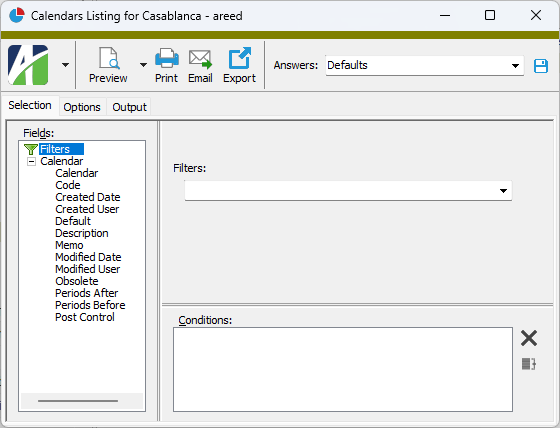
 .
.
 - Provides access to two preview options.
 - Opens the Print dialog so that you can select and configure a printer and then print a paper copy of the report.
 - Opens the
  - Opens a drop-down menu with two export options: